Review of my 2014 predictions

Let’s see:

  • 2014 will be the year of Big Data and the Cloud. By the end of 2014 everyone will be sure that 2015 will be the year of Big Data and the Cloud.

I consider this a yes

  • At least one big cloud provider will make the news for some epic fail (interruption of service, data loss, data theft or something similar…) that will seriously hit the credibility of cloud providers (for at least a week )

I’ll take the “celebgate” as a cloud provider issue

  • PanfilovAB will found more vulnerabilites in Documentum (if EMC releases a major version of the Documentum family, the number of bugs found increased, as he will check if the old bugs he discovered are still present… and of course those will be there ).

This was an easy one

  • 2014 will be the year of D2 and xCP 2.x. By the end of 2014 most people will be thinking that D2 is going to be as successful as CenterStage and that xCP2 is as bad as xCP1 but “nicer”

Next year will be the year of D2 (if they match the funcionality provided by 3.1) and xCP 2.2

  • EMC will release a mobile app for the community. Only for iOS. Android version “coming soon”.

Still waiting

  • Java will lose market share to .NET/Silverlight/Adobe Flash. Oracle will release either Java 7u680 or Java 25 before the end of the year, breaking every single applet/program made with earlier versions in the way. Hopefully Oracle will also bury Oracle UCM deep in the ground.

Sadly no

  • Apple will release iOS 8, forcing every app to be iOS 8 compliant. They’ll release the iPhone 5 in colors you don’t even know existed.

I’d never expected Apple to release a “bendable” phone, that’s for sure

  • Microsoft will release another SP for windows 8 that will bring back the menu bar/start menu. Windows 9 will be announced with a return to windows 3.1 window’s style as main feature.

Close enough with the return of the start menu, and windows 9 10…

  • Real Madrid will won the champions league
  • and Spain will lose the world basketball championship against the USA (damn frenchies!!! we didn’t even get to hte finals )


CMIS vs REST comparison with code examples (Custom WebDAV server for Documentum)

Although My Documentum for Desktop is a nice product when you want a deeper integration with Windows, if you only need WebDAV access for browsing and creating documents it can be too much for the users. So I decided to develop a custom WebDAV server using a 1.x version of milton.io’s WebDAV library (newer 2.x free version doesn’t seem to work well with Office documents).

This library provides a WebDAV Servlet that you can customize for providing your own objects as WebDAV elements. I used CMIS (with Apache Chemistry) to query the repository and provide a WebDAV access to a Documentum repository. I wasn’t happy with the performance so I tried with the REST API as well.

The following is a comparison of features and code between those two implementations:

  CMIS REST
Compatibility Multiple CMS Documentum only
Memory footprint * Big Small
Ease of implementation ** Very easy Easy
Speed/Performance Fast Slightly faster (noticeable difference)

* Memory footprint: Although I’m still not sure of the source of the problem, CMIS consumes every Documentum session specified in dfc.properties. So if you have 100 max concurrent sessions, it’s going to use every single one. This is less noticeable when using a WebDAV client (session usage is between 7-20 sessions) but when using Windows integrated WebDAV client it goes crazy after 2nd level of folders. Not sure if it is due to windows querying every single object displayed or something related to CMIS specification or the implementation in emc-cmis.war

** Ease of implementation: When using CMIS with Apache Chemistry, you can code every single operation with a couple of lines of code.

Using the REST API will require a little bit more coding (I used org.json library to parse the responses):

Create document

  • CMIS:
Folder tempFolder=(Folder)session.getObjectByPath(path);
Map<String, Object> properties = new HashMap<String, Object>();
properties.put(PropertyIds.OBJECT_TYPE_ID, "dm_document");
properties.put(PropertyIds.NAME, newName);  

ContentStream contentStream = new ContentStreamImpl(newName,
          BigInteger.valueOf(length), contentType, in);
Document newDoc = tempFolder.createDocument(properties, contentStream, VersioningState.MAJOR);  

return newDoc.getId();
  • REST:
HttpPost httpPost=new HttpPost(pathId.replace("/objects/","/folders/")
          .replace(".json","/objects.json"));
httpPost.addHeader("Authorization",authorizationString);  

HttpClient client = new DefaultHttpClient();  

String json = "{\"properties\" : {\"object_name\" : \"" + newName +
          "\", \"r_object_type\" :\"dm_document\"}}";  

File temp = File.createTempFile(newName,".tmp");
byte[] data = IOUtils.toByteArray(in);
FileUtils.writeByteArrayToFile(temp, data);  

MultipartEntity reqEntity = new MultipartEntity();
reqEntity.addPart("data", new StringBody (json,
          "application/vnd.emc.documentum",Charset.forName("UTF-8")));
reqEntity.addPart("content", new FileBody(temp, newName, contentType, null));  

httpPost.setEntity(reqEntity);
HttpResponse response = client.execute(httpPost);
temp.delete();  

String result=getResponseAsString(response.getEntity().getContent());
JSONObject obj= new JSONObject(result);
JSONArray jsonArray = (JSONArray) obj.getJSONArray("links");  

return (String)jsonArray.getJSONObject(0).get("href");
Create Folder:

  • CMIS:
    Folder tempFolder=(Folder)session.getObjectByPath(path);
    Map<String, Object> properties = new HashMap<String, Object>();
    properties.put(PropertyIds.OBJECT_TYPE_ID, "cmis:folder");
    properties.put(PropertyIds.NAME, newName);  

    Folder newFolder=tempFolder.createFolder(properties);  

    return newFolder.getId();
  • REST:
    HttpPost httpPost=new HttpPost(pathId.replace("/objects/","/folders/")
                   .replace(".json","/objects.json"));
    httpPost.addHeader("Authorization",authorizationString);  

    HttpClient client = new DefaultHttpClient();  

    String json = "{\"properties\" : {\"object_name\" : \"" + newName +
              "\", \"r_object_type\" :\"dm_folder\"}}";  

    MultipartEntity reqEntity = new MultipartEntity();
    reqEntity.addPart("data", new StringBody (json,
              "application/vnd.emc.documentum",Charset.forName("UTF-8")));  

    httpPost.setEntity(reqEntity);
    HttpResponse response = client.execute(httpPost);  

    String result=getResponseAsString(response.getEntity().getContent());
    JSONObject obj= new JSONObject(result);
    JSONArray jsonArray = (JSONArray) obj.getJSONArray("links");  

    return (String)jsonArray.getJSONObject(0).get("href");
Version object:

  • CMIS:
Document newDoc = (Document) session.getObject(session.createObjectId(objectId));  

ObjectId newVersionId = newDoc.checkOut();
Document newVersion=(Document)session.getObject(newVersionId);
ContentStream cstream = new ContentStreamImpl(newDoc.getContentStream().getFileName(),
               BigInteger.valueOf(length), newDoc.getContentStream().getMimeType(), in);
newVersionId=newVersion.checkIn(true, null, cstream, null);  

return newVersionId.getId();

REST:

HttpGet httpGet=new HttpGet(pathId);
httpGet.addHeader("Authorization",authorizationString);  

HttpClient client = new DefaultHttpClient();  

//get lock-checkout url
HttpResponse response = client.execute(httpGet);  

String result=getResponseAsString(response.getEntity().getContent());
JSONObject obj=new JSONObject(result);
JSONArray jsonArray = (JSONArray) obj.getJSONArray("links");  

String lockUrl=null;
for (int i=0; i<jsonArray.length(); i++){
     if (jsonArray.getJSONObject(i).get("rel").toString().endsWith("checkout")){
         lockUrl=jsonArray.getJSONObject(i).get("href").toString();
     }
}  

//lock-checkout object
HttpPut httpPut=new HttpPut(lockUrl);
httpPut.addHeader("Authorization",authorizationString);  

response = client.execute(httpPut);
result=getResponseAsString(response.getEntity().getContent());
obj=new JSONObject(result);
jsonArray = (JSONArray) obj.getJSONArray("links");  

String objName=obj.getJSONObject("properties").get("object_name").toString();
String checkinUrl=null;  

//get checkin url
for (int i=0; i<jsonArray.length(); i++){
     if (jsonArray.getJSONObject(i).get("rel").toString().endsWith("checkin-next-major")){
         checkinUrl=jsonArray.getJSONObject(i).get("href").toString();
     }
}  

String json = "{\"properties\" : {}}";  

File temp = File.createTempFile(objName,".tmp");
byte[] data = IOUtils.toByteArray(in);
FileUtils.writeByteArrayToFile(temp, data);  

//cheking new version
HttpPost httpPost=new HttpPost(checkinUrl);
httpPost.addHeader("Authorization",authorizationString);  

MultipartEntity reqEntity = new MultipartEntity();
reqEntity.addPart("data", new StringBody (json,
             "application/vnd.emc.documentum",Charset.forName("UTF-8")));
reqEntity.addPart("content", new FileBody( temp , objName, contentType, null));  

httpPost.setEntity(reqEntity);  

response = client.execute(httpPost);
result=getResponseAsString(response.getEntity().getContent());
obj=new JSONObject(result);
jsonArray = (JSONArray) obj.getJSONArray("links");  

return (String)jsonArray.getJSONObject(0).get("href");

Documentum Email Notification improvements

Following PanfilovAB‘s post regarding Documentum email notification system and his customization (read it here: blog.documentum.pro/2014/08/04/e-mail-notifications) I decided to improve my own mail customization by adding the Groovy library in order to get advantage of the customization possibilities.

So, what does Documentum provide by default? Let’s see: Depending on the value stored in the mail_method attribute found in dm_server_config, CS will use:

  • dm_event_sender: Notifications will use dm_event_sender method. This method uses dmbasic to run $DM_HOME/bin/dm_event_sender.ebs. This EBS defines a plain-text email template for each of the possible events generated by the CS and sends the email by running the binary mail.exe bundled with the CS.
  • dm_html_event_sender: Same behaviour than dm_event_sender, but the email templates are HTML templates. In order to use it, dm_event_sender must be modified to use the $DM_HOME/bin/dm_html_event_sender.ebs script.
  • [BPM] dm_template_event_sender: When BPM is intalled in the CS, a new servlet (DO_METHOD) is deployed in JMS. mail_method attribute is updated with this placeholder to use the servlet instead of running a method. When an event generates a notification, a POST is send to the do_method servlet and the notification is processed. If the event is a workflow event, the servlet will process it applying (if has been previously defined) a JSP template and sending the email with Java Mail. Otherwise it will forward the notificacion to the dm_event_sender method.
  • mail method: There’s also a method that allows a “direct call” to mail.exe, as long as you provide the necessary parameters.

So, what main problems/limitations do we have?

  • If you have BPM installed, you have 3 different entry points to a new mail:
    • event_sender
    • html_event_sender
    • JSP templates

So if you update one template, you have to update every file to keep consistency

  • When migrating CS, you have to be careful not to overwrite/remove your customized EBS. And if “something” has changed you’ll have to recheck your existing templates. Meaning you’ll have to enjoy the “power” of dmbasic and its great debugging capabilities (yes, that means writing to an output file)

So, when I read Andrey’s solution using Groovy I realized that if you have to modify your email templates “often”, that’s the way to go. So, what do we need?:

Documentum container with two components and a custom method:

  • List templates
  • Edit template
  • Custom mail method

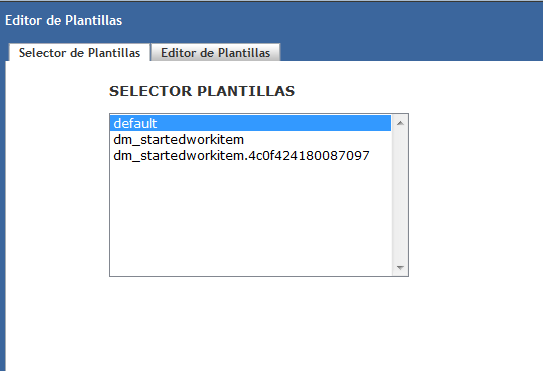
List template will be a listbox showing the documents returned by a query that fetches our custom templates located in a special folder:

Untitled.png

For ease of use, the name of the document indicates the event that uses the template and, if applicable, the r_object_id of the activity that uses the template, allowing further customization.

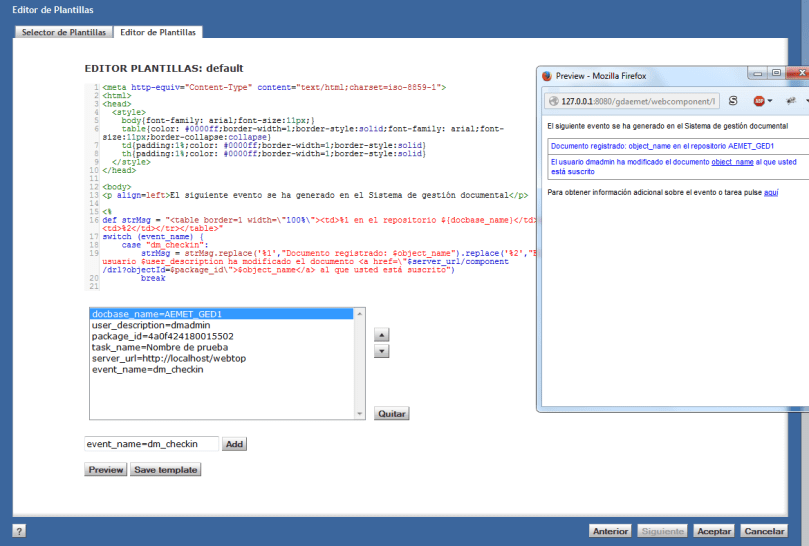
Edit template will be a component that loads the content of the selected template into an editor (codemirror, check Andrey’s updated post to see a “nice” implementation as WDK control), a sortablelistbox that will allow the user to put temporal values to be replaced in the template for preview, and the preview button that will generate the final email applying the submitted values to the template. This component has a <inputvars> element in its definition that defines default values to be already filled (docbase_name, user_description, server_url, etc).

Untitled2.png

Now, I only need to improve my mail designing skills

Finally, a custom Java method that will replace dm_template_event_sender and that will run a java class that generates the email body and sends the email.

What do we get with this customization?

  1. Get rid of dmbasic email notificacions
  2. Unify email notifications (it will only use the defined templates)
  3. Simplify email management (my “default” template now has 200 lines, while my “default” dm_event_sender has 1400)
  4. Easier upgrade process


sortablelistbox bug

I think this is not a very used control, otherwise I guess someone would’ve realized by now that if you do something like:

<dmf:sortablelistbox name="parametersList" id="parametersList" width="400" size="10" multiselect="false"/>

which, according to the WDK guide is correct:

 width (Optional) Width of this control

and then load the page:

org.apache.jasper.JasperException: /custom/jsp/editor/editor.jsp(46,5) No se puede encontrar el método de escritura para el atributo: width

which in english means: Cannot find write method for the attribute width

So, what’s going on? First, we check the control definition in the TLD:

           <attribute>  
             <name>width</name>  
             <required>false</required>  
             <rtexprvalue>true</rtexprvalue>  
             <description>  
                TBD.  
             </description>  
          </attribute>  

Ok, so if the attribute is defined, why doesn’t work?

    com.documentum.web.form.control.sortablelistbox.SortableListBox  
      
      public void setListBoxWidth(String strWidth)  
      {  
        this.m_strWidth = strWidth;  
        getItemsListBoxControl().setWidth(strWidth);  
      }  
      
      public String getListBoxWidth()  
      {  
        return this.m_strWidth;  
      }  

really?

So, you know, either add “listboxwidth” as an attribute in the TLD or recompile the SortableListBox class adding getWidth/setWidth methods.

I’ve checked this happens (at least) on webtop 6.6, 6.7SP2 and 6.7SP2 patch 17.

DCTMMobile application

Finally I got to re-do my android application (almost) from scratch. I’ve used (again) AndroidStudio, but this time instead of using GSON to parse the responses I decided to use the sample client provided by EMC (Documentum REST Java Client Code Sample) I wanted to use the already-done read/write functionality, but things weren’t so simple. Sure, the client works fine as a Java standalone but I’ve found that the Spring RestTemplate doesn’t play well with Android when using Jackson/Jaxb (meaning I was unable to make it work :P), so I end up using the DQL query service to modify/update attributes as I did before.

Of course, executing an updated DQL is not an OOTB function, as the REST Services doesn’t allow write queries, but you can easily modify this behaviour (Customizing/Extending REST services). If you use the OOTB REST Services you’ll get notifications indicating that only read queries are supported when performing an update operation.

I’ve tested the application with 2.3, 3.2, 4.0 and 4.4 android emulators, and it seems that works just fine (except downloading files in <4.x), so feel free to test it

DCTMMobile at GooglePlay: DCTMMobile – Android Apps on Google Play

More info about the app development in previous posts:

Android app using REST services
Android app using REST services (II)

UCF troubleshooting v2

Here is an updated version from previous post (UCF troubleshooting) with some more/new tips:

UCF installation paths:

  • Windows XP: C:\Document and Settings\[user]\Documentum
  • Windows Vista/7/8: C:\Users\[user]\Documentum
  • Linux: ${home}/Documentum

Timeout/browser/jre problems:

  • Check the supported environment tables in webtop/da release notes. Most JRE versions will work even when aren’t supported, but you’d better check if the supported version works.
  • If not needed, disable ACS and BOCS.
  • If using a proxy, add host’s IP and hostname to the proxy exceptions
  • Add Webtop url to the browser’s pop-up blocker exceptions.
  • In case the UCF aplet cannot be installed, try disabling DEP protection
  • Delete the local UCF installation and try a clean installation
  • [Firefox] Check Java plugin is enabled. Mozilla automatically disables outdated JRE plugins.
  • [IE] Check Sun/Oracle JRE is the default JRE, disable ActiveX filtering, and check Java plugins are enabled in the Manage Addons window.
  • [IE/Firefox] If you are working with a 64 bit SO, check you’re using a 32bit browser with 32bit JRE. 64 bit browser/JRE with UCF is probably a bad idea.
  • [IE] Check Java integration with browsers is enabled.
  • [Java control panel] Delete JRE cache
  • [Java control panel] Disable the next generation Java plug-in.
  • [Java control panel] Disable verification of mixed code security.
  • [Java control panel] Check “Direct Connection” is selected in Network Settings (vishnu.music)
  • [UCF configuration] If UCF keeps throwing a timeout, disable the IPv6 compatibility by changing the following line in ucf.installs.config.xml (located in ${Documentum_UCF}/ucf/config)

<option value=”-Djava.net.preferIPv6Addresses=true“/> to <option value=”-Djava.net.preferIPv6Addresses=false“/>

JRE 7u51+ workaround:

In Java control panel check that:

  • Security is set to medium
  • Your application server url is listed under the exception site list

You should also check the thread The specified discussion was not found. by PanfilovAB if you’re having issues with multiple Java versions

Manual installation:

  • You can install the UCF applet in the client computer manually, just run the folowing bat script:
set DIRNAME=%~dp0%lib\
set URLDIR=%DIRNAME:\=/%
java -cp %DIRNAME%ucfinit.jar com.documentum.ucf.client.install.TestInstall "file:///%URLDIR%" "ucf.installer.config.xml"

This is the structure/files you need for this script to work (you can find these files in /wdk/contentXfer/):

UCFTestInstall.bat
\lib
\lib\ExJNIAPI.dll
\lib\ExJNIAPIGateway.jar
\lib\jacob.dll
\lib\jacob.jar
\lib\ucf-ca-office-auto.jar
\lib\ucf-client-installer.zip
\lib\ucf.installer.config.xml
\lib\ucfinit.jar
\lib\UCFWin32JNI.dl

And don’t forget to check UCF logs if you’re still having problems

Monitoring Documentum with Nagios and dctmpy plugin

This is a step-by-step guide to install Nagios and configure dctmpy plugin for monitoring a Documentum environment. Nagios installation is pretty easy as we’ll be doing everything using yum. Then we’ll setup a standard configuration for the plugin.

Environment

Host:
Windows 7 x64 8GB RAM
VMWare Player 6.0.1

Guest:
CentOS 6.5 x64 40GB HD 4GB RAM

PanfilovAB’s dctmpy plugin (Nagios plugin for Documentum)

VM Creation and OS Configuration

Check these steps on (Unofficial) D7.1 Developer Edition

EPEL Repository setup

[root@vm-nagios nagios]# wget http : // epel.mirror.net.in/epel/6/i386/epel-release-6-8.noarch.rpm
[root@vm-nagios nagios]# rpm -Uvh epel-release-6-8.noarch.rpm

Apache

  • Install httpd
[root@vm-nagios nagios]# yum install httpd
  • Start the service
[root@vm-nagios nagios]# service httpd start

MySQL

  • Install MySQL
[root@vm-nagios nagios]# yum install mysql mysql-server
  • Start MySQL service
[root@vm-nagios nagios]# service mysqld start
  • Configure MySQL’s root user
[root@vm-nagios nagios]# mysql_secure_installation

PHP

  • Install PHP module
[root@vm-nagios nagios]# yum install php
  • Check everything is working by creating the following php page:
[root@vm-nagios nagios]# vi /var/www/html/infophp.php
  • Restart the httpd service and check the previously create page
[root@vm-nagios nagios]# service httpd restart
  • Finally, install MySQL module for PHP
[root@vm-nagios nagios]# yum install php-mysql

phpMyAdmin

  • Install the module:
[root@vm-nagios nagios]# yum install phpmyadmin
  • Edit phpMyAdmin.conf and comment the entry:
[root@vm-nagios nagios]# vi /etc/httpd/conf.d/phpMyAdmin.conf
  Alias /phpMyAdmin /usr/share/phpMyAdmin
  Alias /phpmyadmin /usr/share/phpMyAdmin
  #
  #
  # # Apache 2.4
  #
  # Require ip 127.0.0.1
  # Require ip ::1
  #
  #
  #
  # # Apache 2.2
  # Order Deny,Allow
  # Deny from All
  # Allow from 127.0.0.1
  # Allow from ::1
  #
  #
  • Make a copy of the default configuration:
[root@vm-nagios nagios]# cp /usr/share/phpMyAdmin/config.sample.inc.php /usr/share/phpMyAdmin/config.inc.php
  • Change auth mode to “http”
[root@vm-nagios nagios]# vi /usr/share/phpMyAdmin/config.inc.php
  /* Authentication type */
  #$cfg['Servers'][$i]['auth_type'] = 'cookie';
  $cfg['Servers'][$i]['auth_type'] = 'http';
  • Restart httpd service
[root@vm-nagios nagios]# service httpd restart

Development tools

  • You’ll need to install the usual development packages:
[root@vm-nagios nagios]# yum install gd gd-devel gcc glibc glibc-common

Nagios

  • Install all modules
[root@vm-nagios nagios]# yum install nagios*
  • Set a password for the user “nagiosadmin”
[root@vm-nagios nagios]# htpasswd /etc/nagios/passwd nagiosadmin
  • Start Nagios service
[root@vm-nagios nagios]# service nagios start

You should be able to access Nagios browsing localhost/nagios

dctmpy

  • Install Pyhton tools
[root@vm-nagios nagios]# yum install python-setuptools python-setuptools-devel
  • Install dctmpy
[root@vm-nagios nagios]# easy_install argparse nagiosplugin dctmpy
  • Check plugin is working
[root@vm-nagios nagios]# nagios_check_docbroker -H 172.24.3.128 -p 1489
[root@vm-nagios nagios]# nagios_check_docbase -H 172.24.3.128 -p 47625 -l dmadmin -a dmadmin -m login
  • Configure commands.cfg:
[root@vm-nagios nagios]# vi /etc/nagios/objects/commands.cfg
  define command{
  command_name nagios_check_docbroker
  command_line /usr/bin/nagios_check_docbroker -H $HOSTADDRESS$ -p $ARG1$
  }

  #'nagios_check_docbase' commands definition
  define command{
  command_name nagios_check_docbase
  command_line /usr/bin/nagios_check_docbase -H $HOSTADDRESS$ -p $ARG1$ -i $ARG2$ -l $ARG3$ -a $ARG4$ -m $ARG5$
  }
  • In this case we’re going to monitor a Windows machine, so edit nagios.cfg and uncomment the windows.cfg section
[root@vm-nagios nagios]# vi /etc/nagios/nagios.cfg
  # Definitions for monitoring a Windows machine
  cfg_file=/etc/nagios/objects/windows.cfg
  • Edit windows.cfg file and add the services
[root@vm-nagios nagios]# vi /etc/nagios/objects/windows.cfg
  define host{
  use windows-server ; Inherit default values from a template
  host_name WINDOWS_HOST ; The name we're giving to this host
  alias WINDOWS_HOST ; A longer name associated with the host
  address 172.24.3.128 ; IP address of the host
  }
  
  define service{
  use generic-service
  host_name WINDOWS_HOST
  service_description docbroker
  check_command nagios_check_docbroker!1489
  }

  define service{
  use generic-service
  host_name WINDOWS_HOST
  service_description docbase login
  check_command nagios_check_docbase!47625!1000001!dmadmin!dmadmin!login
  }

  define service{
  use generic-service
  host_name WINDOWS_HOST
  service_description docbase sessions
  check_command nagios_check_docbase!47625!1000001!dmadmin!dmadmin!sessioncount -w 70 -c 80
  }

  define service{
  use generic-service
  host_name WINDOWS_HOST
  service_description docbase projection targets
  check_command nagios_check_docbase!47625!1000001!dmadmin!dmadmin!targets
  }

  define service{
  use generic-service
  host_name WINDOWS_HOST
  service_description docbase jms status
  check_command nagios_check_docbase!47625!1000001!dmadmin!dmadmin!jmsstatus
  }

  define service{
  use generic-service
  host_name WINDOWS_HOST
  service_description docbase failed tasks
  check_command nagios_check_docbase!47625!1000001!dmadmin!dmadmin!failedtasks
  }

  define service{
  use generic-service
  host_name WINDOWS_HOST
  service_description docbase job scheduling
  check_command nagios_check_docbase!47625!1000001!dmadmin!dmadmin!jobs -j "dm_DMFilescan,dm_LogPurge" -n system_cleanup_jobs
  }

  define service{
  use generic-service
  host_name WINDOWS_HOST
  service_description cts status
  check_command nagios_check_docbase!47625!1000001!dmadmin!dmadmin!ctsstatus
  }

  define service{
  use generic-service
  host_name WINDOWS_HOST
  service_description cts queue
  check_command nagios_check_docbase!47625!1000001!dmadmin!dmadmin!ctsqueue -w 100 -c 1000
  }
  • Restart Nagios service and you should see the new host with the new services reporting status.

xCP and D2 developer edition announced in EMC World

EMC has announced the future availabily of two new developer edition VMs and hopefully someone will read this wishlist

  • xCP developer edition (June 30th)
    • Confirmed: A working CTS in Linux (wondering how/if office files transformation works).
    • CIS 7.1
    • Now that you guys have installed everything in Linux, take those installation/configuration scripts that you had to modify because were made in windows and bundle them with the linux installers, so we don’t have to run dos2unix for every script file.
    • “Modular” xCP / remove the need to install every component (at least in development environments). (I don’t expect to see this “working” in this developer edition, but hopefully they’ll consider it for the next xCP release…)
  • D2 developer edition (May 30th)
    • I have doubts about this, is this also an open-source VM? If D2-Config is still an activeX you’ll need a windows machine to configure D2.

And hopefully, we’ll see a production-supported PostgreSQL content in a future version (7.1 SP1? Bedrock?) or at least an official statement about this…


Repoint/Older clients compatibility with certificate-based SSL mode

None. (At least officialy)

While configuring a full 7.1/D2 4.2/xCP2.1 environment using this new mode recommended by EMC, I faced the problem of trying to connect to the repository with composer/repoint/older clients.

The first problem came while installing CIS, which is still v7.0. Solution? Just overwrite bundled DFC jars with the ones from 7.1 and you’re good to go (completely unsupported, of course)

  • Composer/repoint (I’m refering to “Composer/repoint” as I’m configuring a composer 6.6 with repoint included -> Composer/Repoint plugins/guides, if you use a “simple” composer, you’d better go and download composer 7.1)
    • Go to Composer\plugins\com.emc.ide.external.dfc_1.0.0\documentum.config and update dfc.properties including the keystore info
    • launch composer -> error (expected)
    • Overwrite everything in Composer\plugins\com.documentum.dfc_1.0.0\lib with 7.1 jars
    • Same with Composer\plugins\com.emc.ide.external.dfc_1.0.0\lib
    • Update Composer\plugins\com.documentum.dfc_1.0.0\config\config.jar with correct dfc.properties
    • launch composer -> success

There most likely be some issues with this way of configuring composer/repoint, however it seems to work (at least you should be able to query the repository)

This works fine for repoint, however, other clients such as Samson or DQL Tester will be useless with 7.1 certificate-based security as those still use the old DMCL.

  • Note about wdk applications (depends on the existing customizations):

By now you should probably imagine what can you do. Overwriting WEB-INF/lib with the lib from a 7.1 WDK app and updating dfc.properties should get you going if you need to connect from an older app to a new repository.


Certificate-based SSL Documentum 7.1 with xCP 2.1

I’ve just finished configuring an environment using the new certificate-based ssl mode included in documentum 7.1 and the full xCP 2.1 stack of products (well, truth is I couldn’t install everything using ssl: xms agent with https?)

After spending (a lot) time configuring this I can say:

  1. SSL mode works fine. Not (noticeable) performance impact.
  2. Almost every component can be configured to use this connection mode except CIS (check esg120422) and the xms agent
  3. Configuration is quite straightforward (Once you’ve done it for the first time)

Now, this was the first time I’ve installed the whole xCP stack and instead of using internal documentation of previous installations, I decided to follow EMC’s instructions:

  1. Surprisingly, most of the installation instructions were accurate!! Most of the components were installed just by following the instructions. Note that this was a development environment, quite simple, without “weird” stuff. Still, my impression about this is that the quality has improved from previous documentation.
  2. The new SSL mode. Nothing here that hasn’t been said before (Ask the Expert: What’s New in EMC Documentum 7.1?). Documentation about this is lacking, confusing and wrong. Either (fix and) include the ssl white paper in the content server installation guide or release a new white paper with accurate instructions to configure this. You can’t get to imagine the amount of time and frustation wasted in the process. Very bad move by EMC.
  3. The “new” (I think this started with 7.0) documentation distribution. Please EMC, either put ALL documentation in the zip file, or make another zip file for the xCP docs. It doesn’t make sense that the xCP deployment guide covers the installation of some components, while others are completely omitted and the documentation is left to be found somewhere else.
  4. Test the installation for every supported environment. It looks really bad when you unzip (-a) a zip file (or a tar one…) in linux and when you try to run a script you get the “error ^M blablabla”. And this has happened to me in every single compressed file. Having to dos2unix every file is not fun.