The new 20.2 release of Documentum comes with a small surprise on DA:


The new 20.2 release of Documentum comes with a small surprise on DA:
This is a step-by-step guide to install Documentum 20.2 in a Linux environment with PostgreSQL 11.
Host:
Windows 10 x64 8GB RAM
VMware Workstation Player 15
Guest:
CentOS 7.7 x64 25GB HD 4GB RAM 2 cores
PostgreSQL 11
Documentum 20.2
Mount the CentOS 7 DVD image, boot the machine and follow the steps. You can choose to let EasyInstall do the work for you. I used minimal package install to save resources, named the machine dctm202, configured the network and set the root password as well as a “dmadmin” user.
[dmadmin@dctm202 ~]$ sudo yum -y install bash-completion kernel-devel rng-tools.x86_64
[dmadmin@dctm202 ~]$ sudo yum -y install bash-completion kernel-devel rng-tools.x86_64 policycoreutils policycoreutils-python selinux-policy selinux-policy-targeted libselinux-utils setroubleshoot-server setools setools-console mcstrans expect tcl
[dmadmin@dctm202 ~]$ sudo yum -y group install X\ Window\ System “Development Tools”
[dmadmin@dctm202 ~]$ sudo yum -y install open-vm-tools.x86_64
[dmadmin@dctm202 ~]$ sudo systemctl disable firewalld
Removed symlink /etc/systemd/system/multi-user.target.wants/firewalld.service.
Removed symlink /etc/systemd/system/dbus-org.fedoraproject.FirewallD1.service.
[dmadmin@dctm202 ~]$ sudo systemctl stop firewalld
[dmadmin@dctm202 ~]$ sudo /sbin/rngd -b -r /dev/urandom -p /dev/random
[dmadmin@dctm202 ~]$ sudo setsebool -P httpd_can_network_connect_db 1
[dmadmin@dctm202 ~]$ sudo chkconfig rngd on
[dmadmin@dctm202 ~]$ sudo yum -y install https://download.postgresql.org/pub/repos/yum/reporpms/EL-7-x86_64/pgdg-redhat-repo-latest.noarch.rpm
[dmadmin@dctm202 ~]$ sudo yum -y install postgresql11 postgresql11-server
[dmadmin@dctm202 ~]$ sudo /usr/pgsql-11/bin/postgresql-11-setup initdb
[dmadmin@dctm202 ~]$ sudo systemctl enable postgresql-11
Created symlink from /etc/systemd/system/multi-user.target.wants/postgresql-11.service to /usr/lib/systemd/system/postgresql-11.service.
[dmadmin@dctm202 ~]$ sudo systemctl start postgresql-11
[dmadmin@dctm202 ~]$ sudo passwd postgres
Changing password for user postgres.
New password:
BAD PASSWORD: The password is shorter than 8 characters
Retype new password:
passwd: all authentication tokens updated successfully.[dmadmin@dctm202 ~]$ su – postgres
-bash-4.2$ psql
psql (11.5)
Type “help” for help.postgres=#
postgres=# \password postgres
Enter new password:
Enter it again:
postgres=# \q
-bash-4.2$ exit
[root@dctm202 ~]# vi /var/lib/pgsql/11/data/postgresql.conf
listen_addresses = ‘*’
port = 5432[root@dctm202 ~]# vi /var/lib/pgsql/11/data/pg_hba.conf
host all all 127.0.0.1/32 md5
host all all ::/128 md5
host all all dctm202 md5
[dmadmin@dctm202 ~]$ sudo systemctl restart postgresql-11
[dmadmin@dctm202 ~]$ sudo yum install -y php php-cli php-common php-pdo php-pgsql httpd apr apr-util httpd-tools libzip mailcap
[dmadmin@dctm202 ~]$ wget https://github.com/phppgadmin/phppgadmin/archive/REL_5-6-0.tar.gz
[dmadmin@dctm202 ~]$ tar -zxvf REL_5-6-0.tar.gz
[dmadmin@dctm202 ~]$ mv phppgadmin-REL_5-6-0/ /usr/share/phppgadmin
[dmadmin@dctm202 ~]$ mv /usr/share/phppgadmin/conf/config.inc.php-dist /usr/share/phppgadmin/conf/config.inc.php
[dmadmin@dctm202 ~]$ sudo vi /etc/httpd/conf.d/phpPgAdmin.conf
Alias /phppgadmin /usr/share/phppgadmin
<Location /phppgadmin>
<IfModule mod_authz_core.c>
# Apache 2.4
Require all granted
#Require host example.com
</IfModule>
<IfModule !mod_authz_core.c>
# Apache 2.2
Order deny,allow
Allow from all
Allow from 127.0.0.1
Allow from ::1
# Allow from .example.com
</IfModule>
</Location>[dmadmin@dctm202 ~]$ sudo vi /etc/phpPgAdmin/config.inc.php-dist
$conf[‘servers’][0][‘host’] = ‘dctm202’;
$conf[‘extra_login_security’] = false;
$conf[‘owned_only’] = true;[dmadmin@dctm202 ~]$ sudo cp /etc/phpPgAdmin/config.inc.php-dist /etc/phpPgAdmin/config.inc.php
[dmadmin@dctm202 ~]$ sudo systemctl restart httpd
Now you should be able to login to the console from http://dctm202/phppgadmin/.
[dmadmin@dctm202 ~]$ sudo yum -y install postgresql11-odbc.x86_64 unixODBC.x86_64
[dmadmin@dctm202 ~]$ sudo vi /etc/odbcinst.ini
[PostgreSQL]
Description = ODBC for PostgreSQL
#Driver = /usr/lib/psqlodbcw.so
#Setup = /usr/lib/libodbcpsqlS.so
#Driver64 = /usr/lib64/psqlodbcw.so
#Setup64 = /usr/lib64/libodbcpsqlS.so
Driver = /usr/pgsql-11/lib/psqlodbcw.so
Driver64 = /usr/pgsql-11/lib/psqlodbcw.so
Setup64 = /usr/lib64/libodbcpsqlS.so
FileUsage = 1
[dmadmin@dctm202 ~]$ sudo vi /etc/odbc.ini
[MyPostgres]
Description=PostgreSQL
Driver=PostgreSQL
Database=postgres
Servername=dctm202
UserName=postgres
Password=dmadmin
Port=5432
Protocol=11
ReadOnly=No
RowVersioning=No
ShowSystemTables=No
ShowOidColumn=No
FakeOidIndex=No
UpdateableCursors=Yes
DEBUG=Yes
[dmadmin@dctm202 ~]$ isql -v MyPostgres
+—————————————+
| Connected! |
| |
| sql-statement |
| help [tablename] |
| quit |
| |
+—————————————+
SQL> quit
[dmadmin@dctm202 ~]$ sudo mkdir -p /opt/documentum && sudo chown dmadmin.dmadmin /opt/documentum && mkdir /opt/documentum/product && mkdir /opt/documentum/product/20.2 && mkdir -p /opt/documentum/sw/cs
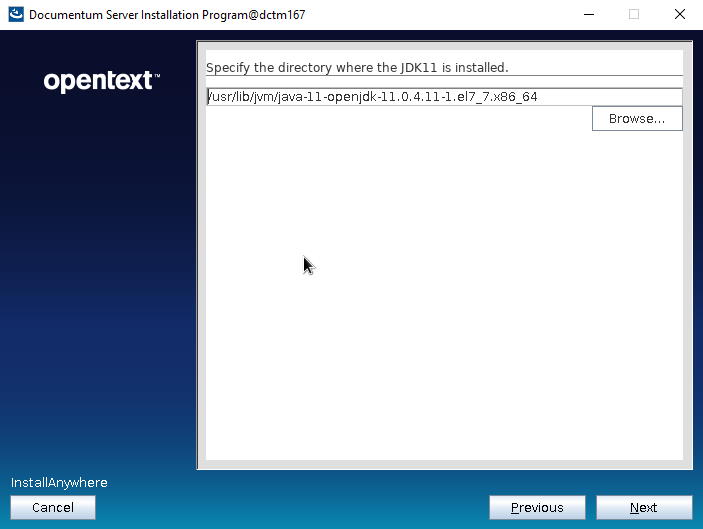
[dmadmin@dctm202 cs]$ sudo yum -y install java-11-openjdk java-11-openjdk-devel
[dmadmin@dctm202 cs]$ echo $(dirname $(dirname $(readlink $(readlink $(which javac)))))
/usr/lib/jvm/java-11-openjdk-11.0.4.11-1.el7_7.x86_64
[dmadmin@dctm202 ~]$ vi ~/.bash_profile
DOCUMENTUM=/opt/documentum
export DOCUMENTUMDM_HOME=$DOCUMENTUM/product/20.2
export DM_HOMEPOSTGRESQL_HOME=/usr/pgsql-11
export POSTGRESQL_HOMEJAVA_HOME=/usr/lib/jvm/java-11-openjdk-11.0.6.10-1.el7_7.x86_64/
export JAVA_HOMEPATH=$PATH:$DM_HOME/bin:$POSTGRESQL_HOME/bin:$HOME/.local/bin:$HOME/bin:$JAVA_HOME/bin
export PATHLC_ALL=C
export LC_ALLLD_LIBRARY_PATH=$POSTGRESQL_HOME/lib:$DM_HOME/bin:$DOCUMENTUM/java64/JAVA_LINK/jre/lib/amd64/server:$LD_LIBRARY_PATH
export LD_LIBRARY_PATH
[dmadmin@dctm202 ~]$ sudo vi /etc/services
dctm202 50000/tcp # dctm 20.2 repo
dctm202_s 50001/tcp # dctm 20.2 repo
[dmadmin@dctm202 ~]$ sudo ln -s /usr/lib64/libsasl2.so.3.0.0 /usr/lib64/libsasl2.so.2
[dmadmin@dctm202 ~]$ sudo vi /etc/security/limits.conf
dmadmin – core -1
[dmadmin@dctm202 cs]$ tar -xvf content_server_20.2_linux64_postgres.tar
[dmadmin@dctm202 cs]$ chmod 777 serverSetup.bin
[dmadmin@dctm202 cs]$ ./serverSetup.bin
[dmadmin@dctm202 cs]$ su –
[root@dctm202 ~]# su – postgres
-bash-4.2$ mkdir /var/lib/pgsql/11/data/db_dctm202_dat.dat
-bash-4.2$ exit
[root@dctm167 ~]# exit
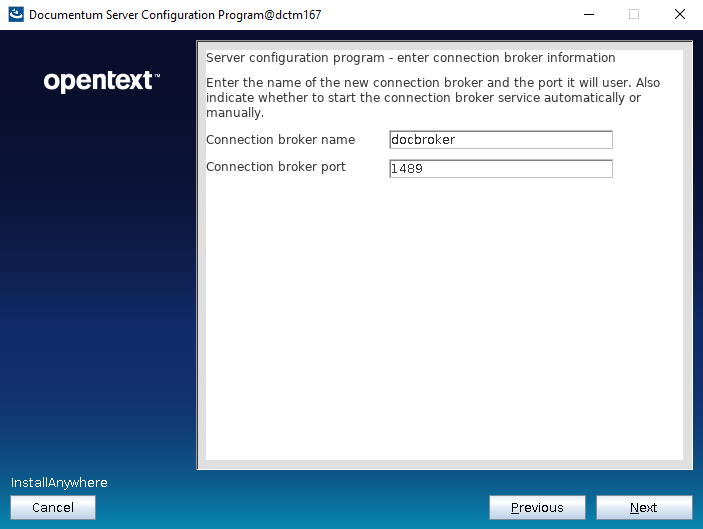
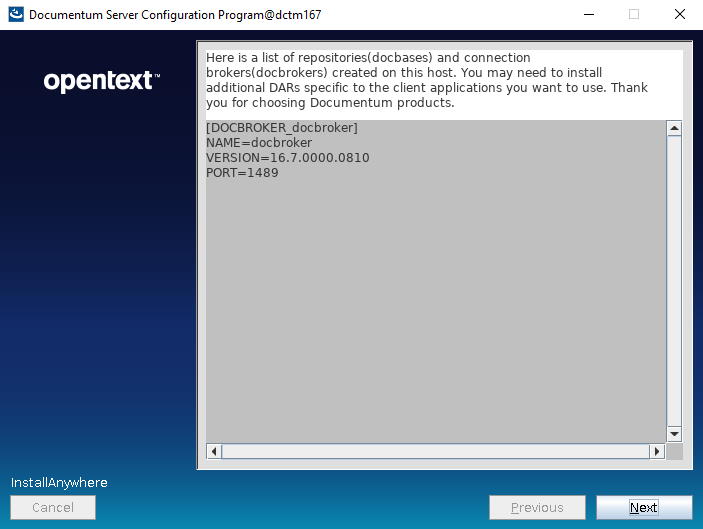
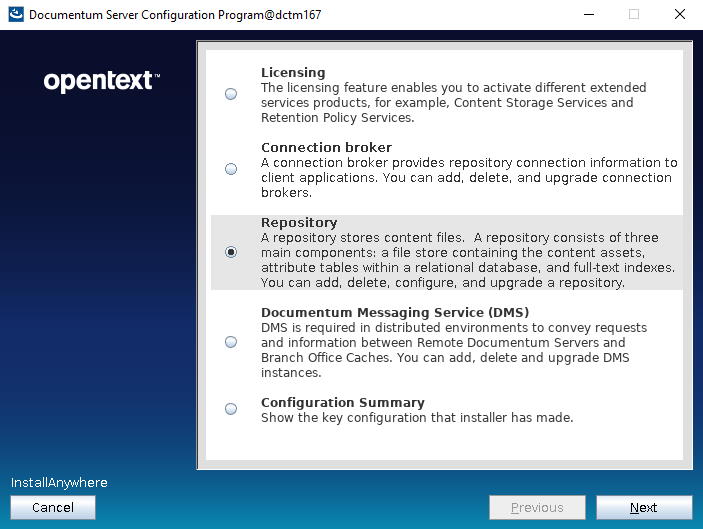
[dmadmin@dctm202 install]$ ./dm_launch_server_config_program.s
And you should know the rest 🙂
I should add: for Documentum newbies in OpenText products 🙂
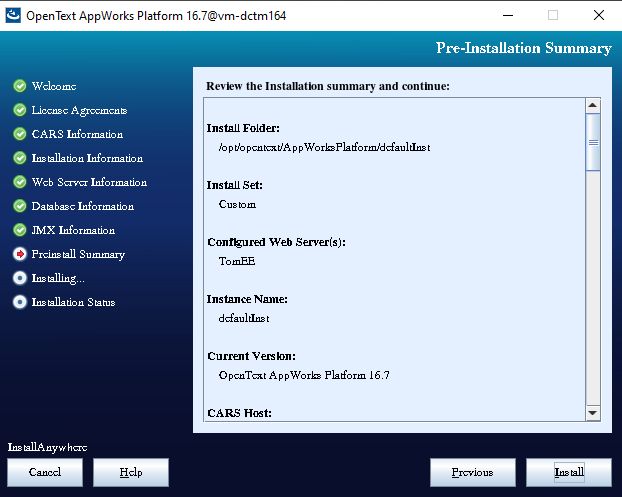
I’ve recently had to test/evaluate OpenText AppWorks as a suitable solution for development purposes.
If you’re not familiar with OpenText portfolio, AppWorks is OpenText equivalent to Documentum’s xCP. A “framework” that allows you to build “process oriented” applications. Also, somewhat like D2, as there’s no coding in AppWorks.
For those of you that are wondering, installing this wasn’t really that easy, and it seems Documentum documentation is not the only “lacking” documentation 🙂
So, let’s start:
Host:
Windows 10 x64 8GB RAM
VMware Workstation Player 12
Guest:
CentOS 7 x64 25GB HD 4GB RAM 2 cores
PostgreSQL 9.6
Documentum 16.4
I’ve used the VM created on the Opentext Documentum 16.4 PostgreSQL Developer Edition, but you can use any VM with PostgreSQL.
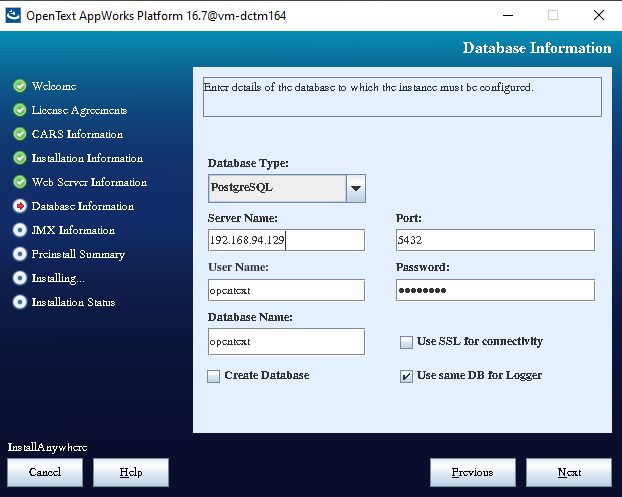
Follow the instructions on any of the previous guides (Opentext Documentum 16.4 PostgreSQL Developer Edition, Opentext Documentum 16.7 PostgreSQL Developer Edition) to get PostgreSQL running, then create a new database. I’ve used phpPgAdmin to create a user (appworks), tablespace (appworks, remember to create the folder on the filesystem before creating the tablespace) and a database (appworks).
Additionally, you also need to download PostgreSQL’s JDBC driver from this page.
Be aware that this is not Tomcat 🙂 You’ll need to download the TomEE (I’ve used the Plume 8.0.0 version) from TomEE download page. As with Tomcat, just unzip and you’ll have a familiar structure. Also, set this TomEE to run under openJDK (I used openJDK 11, as this is required later by AppWorks).
Additional configuration to do:
<role rolename=”tomee-admin” />
<role rolename=”manager-gui”/>
<role rolename=”manager-script”/>
<role rolename=”manager-jmx”/>
<role rolename=”manager-status”/>
<role rolename=”admin-gui”/>
<role rolename=”admin-script”/><user username=”tomee” password=”tomee” roles=”admin-gui,manager-gui,tomee-admin”/>
<user username=”opentext” password=”opentext” roles=”admin-gui,admin-script,manager-gui,manager-script,manager-jms,manager-status,tomee-admin”/>
<user username=”rpc” password=”rpc” roles=”admin-script,manager-script,manager-jmx”/>
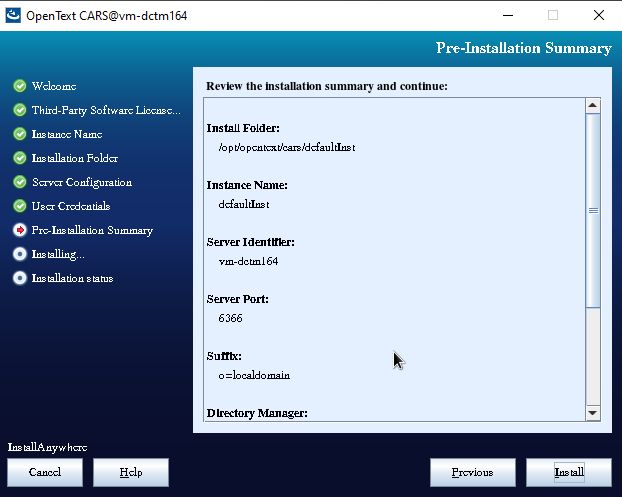
sudo JAVA_HOME=/opt/opentext/jdk-11 CLASSPATH=/opt/opentext/postgresql-42.2.9.jar PATH=/opt/opentext/jdk-11/bin:$PATH ./OpenText_CARS_2.6.bin


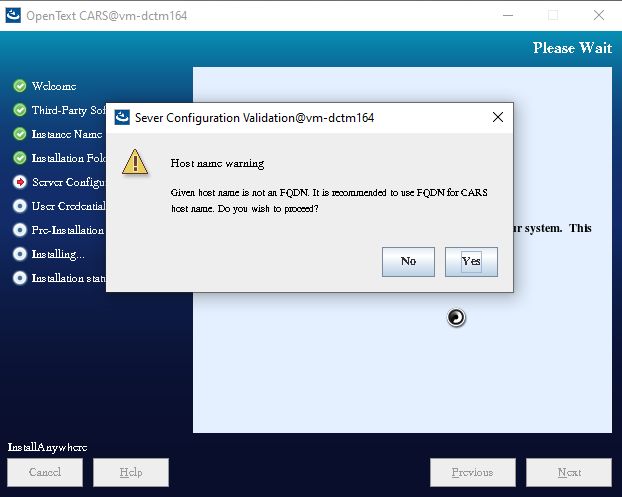


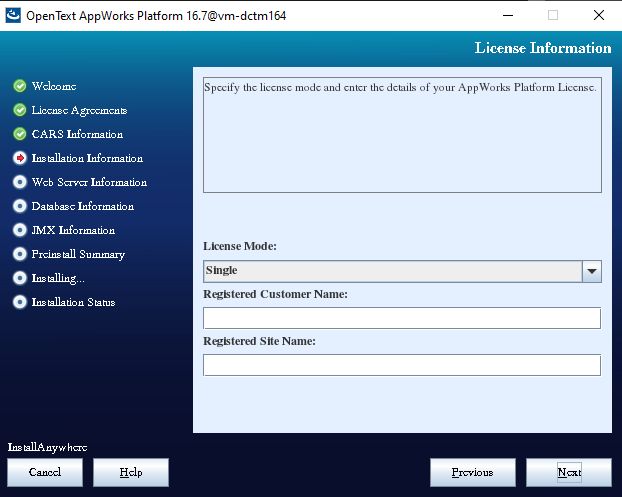
You’ll need a license to install AppWorks. This trial license can be requested from the support site.
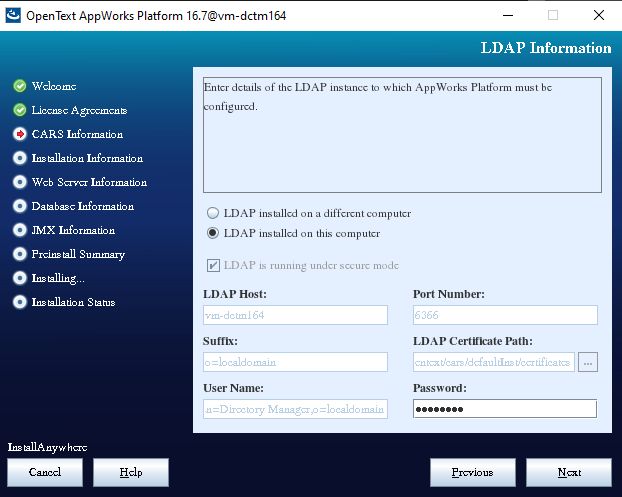
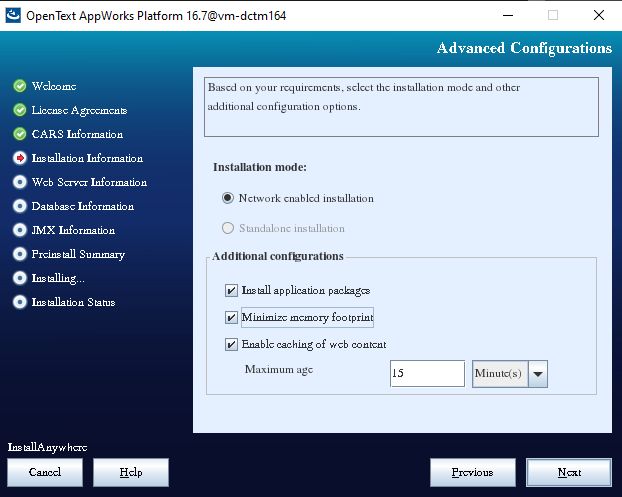
sudo JAVA_HOME=/opt/opentext/jdk-11 CLASSPATH=/opt/opentext/postgresql-42.2.9.jar PATH=/opt/opentext/jdk-11/bin:$PATH ./OpenText_AppWorks_Platform_16.7.bin


Last, but not least, some sources of information related to AppWorks:
This is a step-by-step guide to install Documentum 16.7 in a Linux environment with PostgreSQL 11 and Docker.
Host:
Windows 10 x64 8GB RAM
VMware Workstation Player 15
Guest:
CentOS 7.7 x64 25GB HD 4GB RAM 2 cores
PostgreSQL 11
Docker 19.03.4
You can just follow the procedure described in Opentext Documentum 16.7 PostgreSQL Developer Edition
[dmadmin@dctm167docker ~]$ sudo yum install -y yum-utils && device-mapper-persistent-data && lvm2
[dmadmin@dctm167docker ~]$ sudo yum-config-manager --add-repo https://download.docker.com/linux/centos/docker-ce.repo
[dmadmin@dctm167docker ~]$ sudo yum install -y docker-ce docker-ce-cli containerd.io
[dmadmin@dctm167docker ~]$ sudo systemctl start docker
[dmadmin@dctm167docker dctmdocker]$ sudo yum install -y epel-release
[dmadmin@dctm167docker dctmdocker]$ sudo yum install -y python-pip
[dmadmin@dctm167docker dctmdocker]$ sudo pip install docker-compose
[dmadmin@dctm167docker dctmdocker]$ sudo yum upgrade python*
[dmadmin@dctm167docker dctmdocker]$ docker-compose version
docker-compose version 1.24.1, build 4667896
docker-py version: 3.7.3
CPython version: 2.7.5
OpenSSL version: OpenSSL 1.0.2k-fips  26 Jan 2017
[dmadmin@dctm167docker dockerimage]$ docker load -i Contentserver_Centos.tar
d69483a6face: Loading layer [==================================================>]  209.5MB/209.5MB
72dea7bec644: Loading layer [==================================================>]  217.2MB/217.2MB
d3468dffaa29: Loading layer [==================================================>]  315.1MB/315.1MB
1f70936ed489: Loading layer [==================================================>]  3.072kB/3.072kB
6a28c1188813: Loading layer [==================================================>]  239.6MB/239.6MB
07cf201dbdc0: Loading layer [==================================================>]  225.8kB/225.8kB
abe3ca337db9: Loading layer [==================================================>]  3.297MB/3.297MB
628e629128da: Loading layer [==================================================>]  46.08kB/46.08kB
4893b60dc3f1: Loading layer [==================================================>]  3.568MB/3.568MB
46d106ddfac4: Loading layer [==================================================>]  94.21kB/94.21kB
49adcbc15f60: Loading layer [==================================================>]  4.121GB/4.121GB
e5fd2930e234: Loading layer [==================================================>]  508.5MB/508.5MB
be7e1221aecc: Loading layer [==================================================>]  679.4kB/679.4kB
6a0c0059135d: Loading layer [==================================================>]  7.168kB/7.168kB
4151aa90b006: Loading layer [==================================================>]   2.56kB/2.56kB
Loaded image: contentserver/centos/stateless/cs:16.7.0000.0810
[dmadmin@dctm167docker dockerimage]$ docker images
REPOSITORY                          TAG                 IMAGE ID            CREATED             SIZE
contentserver/centos/stateless/cs   16.7.0000.0810      589b5cf8dbc7        8 weeks ago         5.59GB
[dmadmin@dctm167docker dctmdocker]$ su - postgres
Password:
Last login: Sat Oct 19 19:39:49 CEST 2019 on pts/0
-bash-4.2$ mkdir /var/lib/pgsql/11/data/db_dockerdctm167_dat.dat
-bash-4.2$ exit
logout
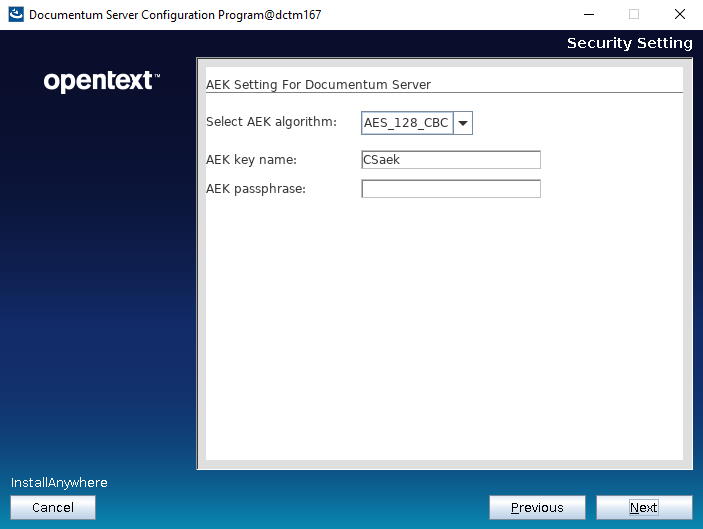
[dmadmin@dctm167docker Scripts]$ vi ~/.bash_profile
export APP_SERVER_PASSWORD=dmadmin
export INSTALL_OWNER_PASSWORD=dmadmin
export ROOT_PASSWORD=dmadmin
export DOCBASE_PASSWORD=dmadmin
export DATABASE_PASSWORD=dmadmin
export GLOBAL_REGISTRY_PASSWORD=dmadmin
export AEK_PASSPHRASE=dmadmin
#For description of parameter please do refer to Readme.txt
version: '3.7'
services:
rcs:
image: contentserver/centos/stateless/cs:16.7.0000.0810
environment:
- DOCKER_HOST=192.168.94.129
- DATABASE_HOST=192.168.94.129
- DATABASE_USER=postgres
- DATABASE_PASSWORD=${DATABASE_PASSWORD}
- DATABASE_SERVER_PORT=5432
- SERVICE_NAME=MyPostgres
- ROOT_PASSWORD=${ROOT_PASSWORD}
- INSTALL_OWNER=dmadmin
- INSTALL_OWNER_PASSWORD=${INSTALL_OWNER_PASSWORD}
- DOCBASE_NAME=dockerdctm167
- GLOBAL_REGISTRY_PASSWORD=${GLOBAL_REGISTRY_PASSWORD}
- AEK_ALGORITHM=AES_256_CBC
- AEK_PASSPHRASE=${AEK_PASSPHRASE}
- AEK_NAME=CSaek
- CONFIGURE_THUMBNAIL_SERVER=NO
- THUMBNAIL_SERVER_PORT=8081
- THUMBNAIL_SERVER_SSL_PORT=8443
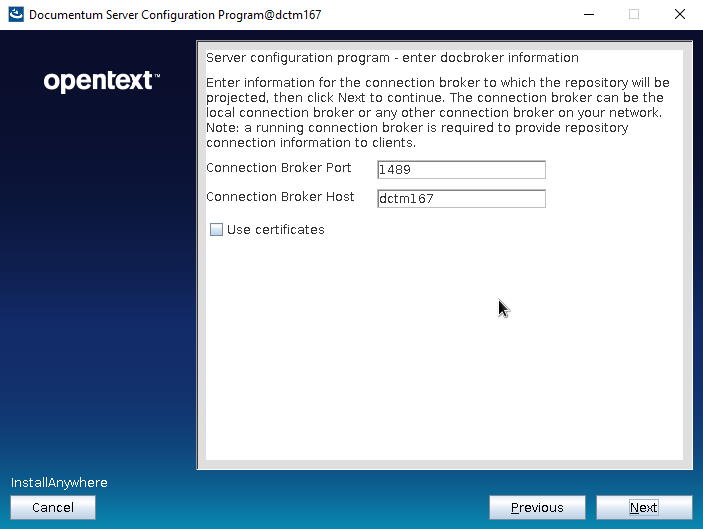
- EXTERNAL_DOCBROKER_PORT=1689
- CONTENTSERVER_PORT=50000
- APP_SERVER_PASSWORD=${APP_SERVER_PASSWORD}
- INSTALL_OWNER_UID=1000
- HIGH_VOLUME_SERVER_LICENSE=
- TRUSTED_LICENSE=
- STORAGEAWARE_LICENSE=
- XMLSTORE_LICENSE=
- SNAPLOCKSTORE_LICENSE=
- RPS_LICENSE=
- FED_RECD_SERVICE_LICENSE=
- RECORD_MANAGER_LICENSE=
- PRM_LICENSE=
- DOCBASE_PASSWORD=${DOCBASE_PASSWORD}
- INSTALLER_UI=silent
- KEEP_TEMP_FILE=false
- INSTALLER_DEBUG_LOG=true
- DOCBASE_ID=453216
- USE_EXISTING_DATABASE_ACCOUNT=
- INDEXSPACE_NAME=DM_XCHIVE_DOCBASE
- USE_EXISTING_AEK=false
hostname:
"dockerdctm167"
container_name:
"dockerdctm167"
ports:
- "1689:1689"
- "1690:1690"
- "50000:50000"
- "50001:50001"
- "9080:9080"
- "9082:9082"
- "9081:9081"
- "9084:9084"
- "8081:8081"
- "8443:8443"
volumes:
- DocbaseName_odbc:/opt/dctm/odbc
- DocbaseName_data:/opt/dctm/data
- DocbaseName_dba:/opt/dctm/dba
- DocbaseName_share:/opt/dctm/share
- DocbaseName_dfc:/opt/dctm/config
- DocbaseName_mdserver_conf:/opt/dctm/mdserver_conf
- DocbaseName_mdserver_log:/opt/dctm/wildfly11.0.0/server/DctmServer_MethodServer/log
- DocbaseName_mdserver_logs:/opt/dctm/wildfly11.0.0/server/DctmServer_MethodServer/logs
- DocbaseName_Thumbnail_Server_conf:/opt/dctm/product/16.7/thumbsrv/conf
- DocbaseName_Thumbnail_Server_webinf:/opt/dctm/product/16.7/thumbsrv/container/webapps/thumbsrv/WEB-INF
- DocbaseName_xhive_storage:/opt/dctm/xhive_storage
- DocbaseName_XhiveConnector:/opt/dctm/wildfly11.0.0/server/DctmServer_MethodServer/deployments/XhiveConnector.ear
- DocbaseName_MigrationUtility:/opt/dctm/product/16.7/install/external_apps/MigrationUtil
privileged: true
#'volumes' service definition:
volumes:
DocbaseName_data:
driver: local
driver_opts:
type: none
o: bind
device: /opt/dctmdocker/data
DocbaseName_share:
driver: local
driver_opts:
type: none
o: bind
device: /opt/dctmdocker/share
DocbaseName_dba:
DocbaseName_dfc:
DocbaseName_odbc:
DocbaseName_mdserver_conf:
DocbaseName_mdserver_log:
DocbaseName_mdserver_logs:
DocbaseName_Thumbnail_Server_conf:
DocbaseName_Thumbnail_Server_webinf:
DocbaseName_XhiveConnector:
driver: local
driver_opts:
type: none
o: bind
device: /opt/dctmdocker/xhive
DocbaseName_xhive_storage:
driver: local
driver_opts:
type: none
o: bind
device: /opt/dctmdocker/xhive_storage
DocbaseName_MigrationUtility:
Note: As usual, documentation is lacking/wrong and the scripts don’t work at all. This is the list of parameters that I had to change in CS-Docker-Compose_Stateless.yml file in order for docker compose to work:
    image: contentserver/centos/stateless/cs:16.7.0000.0810
    environment:
      - DOCKER_HOST=192.168.94.129
      - DATABASE_HOST=192.168.94.129
      - DOCBASE_NAME=dockerdctm167
    hostname:
      "dockerdctm167"
    container_name:
      "dockerdctm167"
    ports:
      - "1689:1689"
      - "1690:1690"
      - "50000:50000"
      - "50001:50001"
      - "9080:9080"
      - "9082:9082"
      - "9081:9081"
      - "9084:9084"
      - "8081:8081"
      - "8443:8443"
volumes:
 DocbaseName_data:
    driver: local
    driver_opts:
      type: none
      o: bind
      device: /opt/dctmdocker/data
 DocbaseName_share:
    driver: local
    driver_opts:
      type: none
      o: bind
      device: /opt/dctmdocker/share
 DocbaseName_XhiveConnector:
    driver: local
    driver_opts:
      type: none
      o: bind
      device: /opt/dctmdocker/xhive
 DocbaseName_xhive_storage:
    driver: local
    driver_opts:
      type: none
      o: bind
      device: /opt/dctmdocker/xhive_storage
Remember that if something goes wrong you’ll have to:
Once the process finishes, you should be able to idql from the container:
[dmadmin@dockerdctm167 ~]$ idql dockerdctm167
Please enter a user (dmadmin):
Please enter password for dmadmin:

        OpenText Documentum idql - Interactive document query interface
        Copyright (c) 2018. OpenText Corporation
        All rights reserved.
        Client Library Release 16.7.0000.0322

Connecting to Server using docbase dockerdctm167
[DM_SESSION_I_SESSION_START]info:  "Session 0106ea608000050f started for user dmadmin."

Connected to OpenText Documentum Server running Release 16.7.0000.0810  Linux64.Postgres
1>
This is a step-by-step guide to install Documentum 16.7 in a Linux environment with PostgreSQL 11.
Host:
Windows 10 x64 8GB RAM
VMware Workstation Player 15
Guest:
CentOS 7.7 x64 25GB HD 4GB RAM 2 cores
PostgreSQL 11
Documentum 16.7
Mount the CentOS 7 DVD image, boot the machine and follow the steps. You can choose to let EasyInstall do the work for you. I used minimal package install to save resources, named the machine dctm167, configured the network and set the root password as well as a “dmadmin” user.
[dmadmin@dctm167 ~]$ sudo yum -y install bash-completion kernel-devel rng-tools.x86_64
[dmadmin@dctm167 ~]$ sudo yum -y install bash-completion kernel-devel rng-tools.x86_64 policycoreutils policycoreutils-python selinux-policy selinux-policy-targeted libselinux-utils setroubleshoot-server setools setools-console mcstrans expect tcl
[dmadmin@dctm167 ~]$ sudo yum -y group install X\ Window\ System “Development Tools”
[dmadmin@dctm167 ~]$ sudo yum -y install open-vm-tools.x86_64
[dmadmin@dctm167 ~]$ sudo systemctl disable firewalld
Removed symlink /etc/systemd/system/multi-user.target.wants/firewalld.service.
Removed symlink /etc/systemd/system/dbus-org.fedoraproject.FirewallD1.service.
[dmadmin@dctm167 ~]$ sudo systemctl stop firewalld
[dmadmin@dctm167 ~]$ sudo /sbin/rngd -b -r /dev/urandom -p /dev/random
[dmadmin@dctm167 ~]$ sudo setsebool -P httpd_can_network_connect_db 1
[dmadmin@dctm167 ~]$ sudo chkconfig rngd on
[dmadmin@dctm167 ~]$ sudo yum -y install https://download.postgresql.org/pub/repos/yum/11/redhat/rhel-7-x86_64/pgdg-centos11-11-2.noarch.rpm
[dmadmin@dctm167 ~]$ sudo yum -y install postgresql11 postgresql11-server
[dmadmin@dctm167 ~]$ sudo /usr/pgsql-11/bin/postgresql-11-setup initdb
[dmadmin@dctm167 ~]$ sudo systemctl enable postgresql-11
Created symlink from /etc/systemd/system/multi-user.target.wants/postgresql-11.service to /usr/lib/systemd/system/postgresql-11.service.
[dmadmin@dctm167 ~]$ sudo systemctl start postgresql-11
[dmadmin@dctm167 ~]$ sudo passwd postgres
Changing password for user postgres.
New password:
BAD PASSWORD: The password is shorter than 8 characters
Retype new password:
passwd: all authentication tokens updated successfully.[dmadmin@dctm167 ~]$ su – postgres
-bash-4.2$ psql
psql (11.5)
Type “help” for help.postgres=#
postgres=# \password postgres
Enter new password:
Enter it again:
postgres=# \q
-bash-4.2$ exit
[root@dctm167 ~]# vi /var/lib/pgsql/11/data/postgresql.conf
listen_addresses = ‘*’
port = 5432[root@dctm167 ~]# vi /var/lib/pgsql/11/data/pg_hba.conf
host all all 127.0.0.1/32 md5
host all all ::/128 md5
host all all dctm167 md5
[dmadmin@dctm167 ~]$ sudo systemctl restart postgresql-11
[dmadmin@dctm167 ~]$ sudo yum -y install phpPgAdmin httpd
[dmadmin@dctm167 ~]$ sudo vi /etc/httpd/conf.d/phpPgAdmin.conf
Alias /phpPgAdmin /usr/share/phpPgAdmin
# Apache 2.4
Require all granted
#Require host example.com# Apache 2.2
Order deny,allow
Allow from all
#Allow from 127.0.0.1
#Allow from ::1
# Allow from .example.com[dmadmin@dctm167 ~]$ sudo vi /etc/phpPgAdmin/config.inc.php-dist
$conf[‘servers’][0][‘host’] = ‘dctm167’;
$conf[‘extra_login_security’] = false;
$conf[‘owned_only’] = true;[dmadmin@dctm167 ~]$ sudo cp /etc/phpPgAdmin/config.inc.php-dist /etc/phpPgAdmin/config.inc.php
[dmadmin@dctm167 ~]$ sudo systemctl restart httpd
Now you should be able to login to the console from http://dctm167/phpPgAdmin/
[dmadmin@dctm167 ~]$ sudo yum -y install postgresql11-odbc.x86_64 unixODBC.x86_64
[dmadmin@dctm167 ~]$ sudo vi /etc/odbcinst.ini
[PostgreSQL]
Description = ODBC for PostgreSQL
#Driver = /usr/lib/psqlodbcw.so
#Setup = /usr/lib/libodbcpsqlS.so
#Driver64 = /usr/lib64/psqlodbcw.so
#Setup64 = /usr/lib64/libodbcpsqlS.so
Driver = /usr/pgsql-11/lib/psqlodbcw.so
Driver64 = /usr/pgsql-11/lib/psqlodbcw.so
Setup64 = /usr/lib64/libodbcpsqlS.so
FileUsage = 1
[dmadmin@dctm167 ~]$ sudo vi /etc/odbc.ini
[MyPostgres]
Description=PostgreSQL
Driver=PostgreSQL
Database=postgres
Servername=dctm167
UserName=postgres
Password=dmadmin
Port=5432
Protocol=11
ReadOnly=No
RowVersioning=No
ShowSystemTables=No
ShowOidColumn=No
FakeOidIndex=No
UpdateableCursors=Yes
DEBUG=Yes
[dmadmin@dctm167 ~]$ isql -v MyPostgres
+—————————————+
| Connected! |
| |
| sql-statement |
| help [tablename] |
| quit |
| |
+—————————————+
SQL> quit
[dmadmin@dctm167 ~]$ sudo mkdir -p /opt/documentum && sudo chown dmadmin.dmadmin /opt/documentum && mkdir /opt/documentum/product && mkdir /opt/documentum/product/16.7 && mkdir -p /opt/documentum/sw/cs
[dmadmin@dctm167 cs]$ sudo yum -y install java-11-openjdk java-11-openjdk-devel
[dmadmin@dctm167 cs]$ echo $(dirname $(dirname $(readlink $(readlink $(which javac)))))
/usr/lib/jvm/java-11-openjdk-11.0.4.11-1.el7_7.x86_64
[dmadmin@dctm167 ~]$ vi ~/.bash_profile
DOCUMENTUM=/opt/documentum
export DOCUMENTUMDM_HOME=$DOCUMENTUM/product/16.7
export DM_HOMEPOSTGRESQL_HOME=/usr/pgsql-11
export POSTGRESQL_HOMEJAVA_HOME=/usr/lib/jvm/java-11-openjdk-11.0.4.11-1.el7_7.x86_64
export JAVA_HOMEPATH=$PATH:$DM_HOME/bin:$POSTGRESQL_HOME/bin:$HOME/.local/bin:$HOME/bin:$JAVA_HOME/bin
export PATHLC_ALL=C
export LC_ALLLD_LIBRARY_PATH=$POSTGRESQL_HOME/lib:$DM_HOME/bin:$DOCUMENTUM/java64/JAVA_LINK/jre/lib/amd64/server:$LD_LIBRARY_PATH
export LD_LIBRARY_PATH
[dmadmin@dctm167 ~]$ sudo vi /etc/services
dctm167 50000/tcp # dctm 16.7 repo
dctm167_s 50001/tcp # dctm 16.7 repo
[dmadmin@dctm167 ~]$ sudo ln -s /usr/lib64/libsasl2.so.3.0.0 /usr/lib64/libsasl2.so.2
[dmadmin@dctm167 ~]$ sudo vi /etc/security/limits.conf
dmadmin – core -1
[dmadmin@dctm167 cs]$ tar -xvf content_server_16.7_linux64_postgres.tar
[dmadmin@dctm167 cs]$ chmod 777 serverSetup.bin
[dmadmin@dctm167 cs]$ ./serverSetup.bin


[dmadmin@dctm167 cs]$ su –
[root@dctm167 ~]# su – postgres
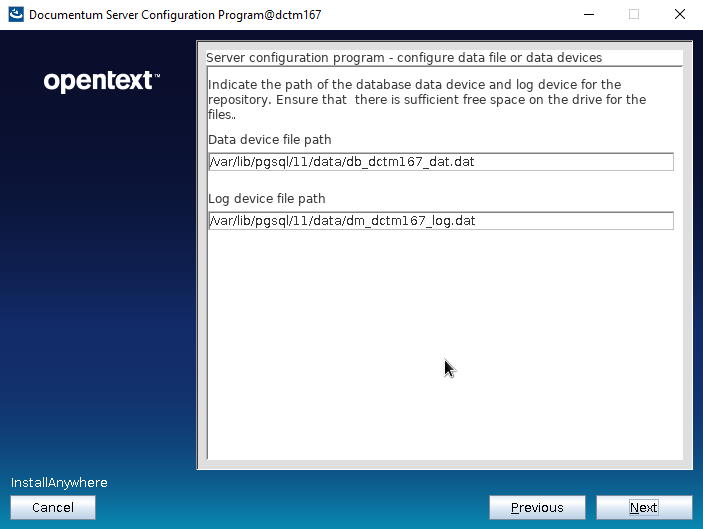
-bash-4.2$ mkdir /var/lib/pgsql/11/data/db_dctm167_dat.dat
-bash-4.2$ exit
[root@dctm167 ~]# exit
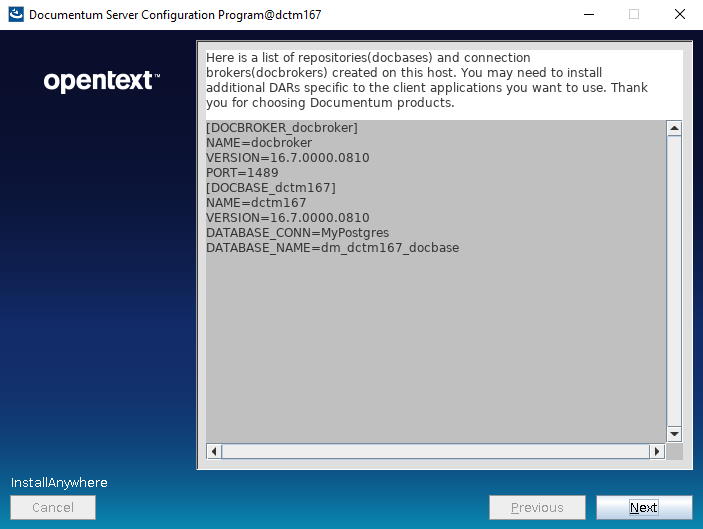
[dmadmin@dctm167 install]$ ./dm_launch_server_config_program.sh


Nothing special about this, same procedure as always. I’ve used the latest tomcat 9 to deploy running on the same openJDK 11 used for the repository:
Some notes:
From the release notes:
Every other product from the stack has also been released as 16.7
As you may or may not know, DQL Tester doesn’t work anymore with Documentum >= 16.4, as the support for dmcl.dll has been dropped. However, there’s a new project that tries to provide a similar tool that works with Documentum: DQL Tester FX
I’ve downloaded the code and done some modifications of my own (shortcuts, changed some button positions, etc.), and it’s quite easy (despite using JavaFX, which is not something that every Documentum developer is used to).
As the how-to to set up the project is done usgin IntelliJ, here you can find another how-to to configure the project on eclipse (without using maven, sorry):
This should get you going with the project in Eclipse.
In a previous post I explained how to perform a full import of the D2 configuration without using D2-Config (D2-Config without ActiveX). You can also export the D2-Configuration to a XML file by using the bundled d2configutils in D2-Config. But how about exporting a full D2-Config as a zip file (including images, etc.)?. Well, here you go:
getSManager();
session=sm.getSession("repository");

D2Session.initTBOEx(session,false);
D2Config config=new D2Config(session);

//this will place the zip file in your temp folder
File zipConfigfile = config.getZipExport(null, null, false, new ArrayList());

sm.release(session);
If you want to export just a single application/configuration, just change the second parameter to the name of your application/configuration.
Since v16.4, Opentext doesn’t provide a “preconfigured” Docker image for Documentum running on Oracle. If you want to use a docker image running PostgreSQL you can use the same procedure as described for Full docker CS7.3 PostgreSQL + D2 4.7 installation guide or DCTM 7.3 PostgreSQL with Docker install guide, and you should not have too many issues 😀
This guide will help you setup a VM running CentOS 7 where we will install Oracle (Express) and docker, and will be building a Documentum image. We will split the build in several images to avoid having to do a full rebuild if something goes wrong 😀
Host:
Windows 10 x64 8GB RAM
VMware Workstation Player 12
Guest:
CentOS 7 x64 25GB HD 4GB RAM 2 cores
Docker 1.13.1
Mount the CentOS 7 DVD image, boot the machine and follow the steps. You can choose to let EasyInstall do the work for you. I used minimal package install to save resources, named the machine vm-dctmdocker, configure the network and set the root password.
[dmadmin@vm-dctmdocker opt]$ sudo mkdir documentum
[dmadmin@vm-dctmdocker opt]$ sudo chown dmadmin.dmadmin documentum
[dmadmin@vm-dctmdocker documentum]$ mkdir installers
[dmadmin@dctmdocker installers]$ cp /mnt/hgfs/dctm72/oracle-xe-11.2.0-1.0.x86_64.rpm/Disk1/oracle-xe-11.2.0-1.0.x86_64.rpm .
[dmadmin@vm-dctmdocker installers]$ sudo yum install libaio bc
[dmadmin@vm-dctmdocker installers]$ sudo rpm -ivh oracle-xe-11.2.0-1.0.x86_64.rpm
[dmadmin@vm-dctmdocker installers]$ sudo /etc/init.d/oracle-xe configure
[dmadmin@vm-dctmdocker installers]$ . /u01/app/oracle/product/11.2.0/xe/bin/oracle_env.sh
[dmadmin@vm-dctmdocker installers]$ /u01/app/oracle/product/11.2.0/xe/bin/sqlplus system
EXEC DBMS_XDB.SETLISTENERLOCALACCESS(FALSE);
ALTER PROFILE DEFAULT LIMIT PASSWORD_LIFE_TIME UNLIMITED;
quit
We’ll just install docker, adding dmadmin user to the docker group so we don’t need to use sudo every time we want to run the “docker” command
[dmadmin@vm-dctmdocker installers]$ sudo yum install docker
[dmadmin@vm-dctmdocker installers]$ sudo usermod -a -G docker dmadmin
[dmadmin@vm-dctmdocker installers]$ systemctl restart docker.service
This base image will just add required packages and minor configurations:
[dmadmin@vm-dctmdocker installers]$ docker pull centos
[dmadmin@vm-dctmdocker installers]$ docker build –no-cache -f ./customCentosDockerfile -t custom_centos .
customCentosDockerfile:
FROM centos
MAINTAINER aldago
RUN echo root:root | chpasswd
RUN yum install -y rng-tools.x86_64 unzip libaio sudo tail vi openssh-server; \
yum clean all; \
sed -i ‘s/PermitRootLogin without-password/PermitRootLogin yes/’ /etc/ssh/sshd_config; \
sed ‘s@session\s*required\s*pam_loginuid.so@session optional pam_loginuid.so@g’ -i /etc/pam.d/sshdRUN /sbin/rngd -b -r /dev/urandom -p /dev/random
This image will install Documentum binaries and Oracle client:
[dmadmin@vm-dctmdocker installers]$ docker build –no-cache -f ./dctmcentosDockerfile -t centos_dctm .
Dockerfile:
FROM custom_centos
MAINTAINER aldago
RUN echo root:root | chpasswd
ADD db/install/oracle-instantclient11.2-sqlplus-11.2.0.3.0-1.x86_64.rpm /tmp/oracle-instantclient11.2-sqlplus-11.2.0.3.0-1.x86_64.rpm
ADD db/install/oracle-instantclient11.2-basic-11.2.0.3.0-1.x86_64.rpm /tmp/oracle-instantclient11.2-basic-11.2.0.3.0-1.x86_64.rpmRUN rpm -ivh /tmp/oracle-instantclient11.2-sqlplus-11.2.0.3.0-1.x86_64.rpm /tmp/oracle-instantclient11.2-basic-11.2.0.3.0-1.x86_64.rpm; \
rm /tmp/oracle-instantclient11.2-sqlplus-11.2.0.3.0-1.x86_64.rpm; \
rm /tmp/oracle-instantclient11.2-basic-11.2.0.3.0-1.x86_64.rpm## create dmadmin user
RUN useradd dmadmin; \
passwd -f -u dmadmin; \
mkdir -p /home/dmadmin/.ssh; chown dmadmin /home/dmadmin/.ssh; chmod 700 /home/dmadmin/.ssh; \
echo “dmadmin ALL=(ALL) ALL” >> /etc/sudoers.d/dmadmin; \
sed -i -e ‘s/Defaults requiretty.*/ #Defaults requiretty/g’ /etc/sudoers# Create folder structure
RUN mkdir /opt/documentum; \
mkdir /opt/documentum/product; \
mkdir /opt/documentum/product/16.4; \
mkdir /opt/documentum/install; \
mkdir /opt/documentum/db; \
chown -R dmadmin:dmadmin /opt/documentumADD cs/install/* /opt/documentum/install/
ADD cs/config/installProperties.properties /opt/documentum/install/
ADD cs/config/configProperties.properties /opt/documentum/install/
ADD cs/config/configPropertiesDoc.properties /opt/documentum/install/ADD db/config/tnsnames.ora /opt/documentum/db/
ADD db/config/fix_tnsnames.sh /opt/documentum/
RUN chown dmadmin.dmadmin /opt/documentum/fix_tnsnames.sh; \
chown dmadmin.dmadmin /opt/documentum/db/tnsnames.ora; \
chmod u+x /opt/documentum/fix_tnsnames.sh; \
chmod u+g /opt/documentum/db/tnsnames.oraRUN echo “#dctm services” >> /etc/services ; \
echo “dctm164 49001/tcp # 16.4 Repository native connection” >> /etc/services ; \
echo “dctm164_s 49002/tcp # 16.4 Repository secure connection” >> /etc/services ; \
ln /usr/lib64/libsasl2.so.3 /usr/lib64/libsasl2.so.2; \
ln -s /usr/lib/oracle/11.2/client64/lib/libclntsh.so.11.1 /usr/lib/oracle/11.2/client64/lib/libclntsh.so; \
ln -s /usr/lib/oracle/11.2/client64/lib/libocci.so.11.1 /usr/lib/oracle/11.2/client64/lib/libocci.so; \
chown -R dmadmin:dmadmin /opt/documentum/install; \
chmod u+x /opt/documentum/install/serverSetup.binUSER dmadmin
ENV DOCUMENTUM /opt/documentum
ENV DM_HOME $DOCUMENTUM/product/16.4
ENV LC_ALL C
ENV JAVA_HOME /opt/documentum/java64/1.8.0_152
ENV ORACLE_HOME /usr/lib/oracle/11.2/client64
ENV ORACLE_SID XE
ENV PATH $ORACLE_HOME/bin:$DM_HOME/bin:$PATH
ENV NLS_LANG AMERICAN_AMERICA.AL32UTF8
ENV LD_LIBRARY_PATH=/usr/lib/oracle/11.2/client64/lib:$DM_HOME/bin/FIPS/:$JAVA_HOME/jre/lib/amd64/server:$DM_HOME/bin:$LD_LIBRARY_PATH
ENV R_SHLIB_LD_LIBRARY_PATH=$DM_HOME/bin/FIPS
ENV PATH=/usr/lib/oracle/11.2/client64/bin:$PATH
ENV TNS_ADMIN=/opt/documentum/dbRUN $DOCUMENTUM/install/serverSetup.bin -f installProperties.properties
ENV DBHOST 192.168.231.135
RUN /opt/documentum/fix_tnsnames.sh; \
mv $DM_HOME/bin/dmdbtest $DM_HOME/bin/dmdbtest.bak; \
echo “exit 0” >> $DM_HOME/bin/dmdbtest; \
chmod u+x $DM_HOME/bin/dmdbtestEXPOSE 22
This image will run the repository configuration:
[dmadmin@vm-dctmdocker installers]$ docker build –no-cache -t dctm164 .
Dockerfile:
FROM centos_dctm
MAINTAINER aldago
USER dmadmin
ENV DBHOST 192.168.231.135
RUN sed -i “/SERVER.PROJECTED_DOCBROKER_HOST/cSERVER.PROJECTED_DOCBROKER_HOST=$HOSTNAME” /opt/documentum/install/configProperties.properties; \
sed -i “/SERVER.SMTP_SERVER_NAME/cSERVER.SMTP_SERVER_NAME=$HOSTNAME” /opt/documentum/install/configProperties.properties; \
sed -i “/SERVER.FQDN/cSERVER.FQDN=$HOSTNAME” /opt/documentum/install/configProperties.properties; \
/opt/documentum/product/16.4/install/dm_launch_server_config_program.sh -f /opt/documentum/install/configProperties.propertiesRUN sed -i “/dfc.session.secure_connect_default/cdfc.session.secure_connect_default=try_native_first” /opt/documentum/config/dfc.properties
EXPOSE 22 1489 1492 49001 49002
ADD cs/config/startup-dctm.sh /opt/documentum/startup-dctm.sh
USER root
RUN chown dmadmin.dmadmin /opt/documentum/startup-dctm.sh; \
chmod u+x /opt/documentum/startup-dctm.shUSER dmadmin
CMD /opt/documentum/fix_tnsnames.sh; /opt/documentum/startup-dctm.sh ; bash
Custom scripts created for the install:
If something goes wrong at some point, remember you’ll need to:
Similar to the previous posts about configuring dqMan/DQLTester (Multiple environments with dqMan/DQLTester) and tomcat (Multiple environments with Tomcat/DA), Composer can be launched the same way:
Folder structure:
Composer.bat:
@Echo off SETLOCAL ENABLEEXTENSIONS SET composerfolder=path to composer folder<span id="mce_SELREST_start" style="overflow:hidden;line-height:0;"></span> SET folderbase=dfcproperties SET parambase=-Ddfc.properties.file= echo **************** echo 1. env1 dev echo 2. env2 prod ... echo **************** SET /p var= ^> Choose option: if "%var%"=="1" goto op1 if "%var%"=="2" goto op2 ... :op1 SET JAVA_TOOL_OPTIONS=%parambase%%cd%\%folderbase%\env1\dev\dfc.properties goto finish :op2 SET JAVA_TOOL_OPTIONS=%parambase%%cd%\%folderbase%\env1\prod\dfc.properties goto finish ... :finish start "" /D %composerfolder% /B %composerfolder%\composer.exe cls&exit
