Opentext has released with the 20.4 release a new search engine that will replace xPlore, and that currently is supported in “testing” mode.
Documentation for Documentum Search is better than previous documentations (parameters are finally “properly” explained), and you can also find a full .yaml file to use as template. However, as we could have expected, that didn’t work, so some changes are required.
Environment
Host:
Windows 10 x64 8GB RAM
VMware Workstation Player 15
Guest:
CentOS 7.7 x64 25GB HD 4GB RAM 2 cores
PostgreSQL 11
Documentum 20.4
VM Creation
Just follow the Documentum 20.4 PostgreSQL post as I’ve used that VM.
Install Docker
Refer to Documentum 20.2 Docker install guide if you need help
Documentum Search 20.4
- Get the images from the Opentext registry:
[dmadmin@dctm204 opt]$ docker login registry.opentext.com
[dmadmin@dctm204 opt]$ docker pull registry.opentext.com/dctm-search-agent:20.4.0
[dmadmin@dctm204 opt]$ docker pull registry.opentext.com/dctm-search-admin:20.4.0
[dmadmin@dctm204 opt]$ docker pull registry.opentext.com/dctm-search-cps:20.4.0
[dmadmin@dctm204 opt]$ docker pull registry.opentext.com/dctm-search-lunr:20.4.0
[dmadmin@dctm204 opt]$ docker pull registry.opentext.com/dctm-search-solr:20.4.0
- Create folder structure. This is the one I’ve used:
[dmadmin@dctm204 opt]$ tree search
search/
|– admin
| `– logs
|– agent
| `– logs
|– cps
| `– logs
|– cps2
| `– logs
|– dfc.properties
|– lunr
| `– logs
|– search.yaml
|– solr
| |– base
| | |– log4j2.xml
| | `– logs
| |– logs
|– solr2
| |– base
| | |– log4j2.xml
| | `– logs
| |– logs
|– zoo
| |– data
| |– datalog
| `– logs
`– zoo.cfg
- Create configuration files:
[dmadmin@dctm204 search]$ cp ../documentum/config/dfc.properties .
[dmadmin@dctm204 search] vi zoo.cfg
dataDir=/data
dataLogDir=/datalog
clientPort=2181
tickTime=2000
initLimit=5
syncLimit=2
autopurge.snapRetainCount=3
autopurge.purgeInterval=0
maxClientCnxns=60
standaloneEnabled=true
admin.enableServer=true
4lw.commands.whitelist=mntr,conf,ruok
[dmadmin@dctm204 search] vi solr/base/log4j2.xml
<extract this file from the solr container>
- Create search.yaml:
[dmadmin@dctm204 search]$ sudo vi search.yaml
<copy the template from the documentation>
At this point, I had several issues with the solr image. First, the container could not write into the mounted folder. In order to fix this, I had to force the uid in the yaml file by adding the following:
user: ‘1000:1000’
After this, Java could not allocate memory for large memory pages. In the end I create a custom image based on the the one from OT (follow the steps detailed on the Reducing Opentext Documentum 20.2 Docker image size post:
[dmadmin@dctm204 search]$ docker run -u 0 –privileged -it –entrypoint /bin/bash registry.opentext.com/dctm-search-solr:20.4.0
echo 22960 > /proc/sys/vm/nr_hugepages
echo 1000 > /proc/sys/vm/hugetlb_shm_group
echo “* soft memlock 626688” >> /etc/security/limits.conf
echo “* hard memlock 626688” >> /etc/security/limits.conf
- Now if you’ve adjusted the values correctly on the yaml file (stick to 2 “replicas” or the container will also fail) you should be able to run
[dmadmin@dctm204 search]$ docker-compose -f search.yaml up
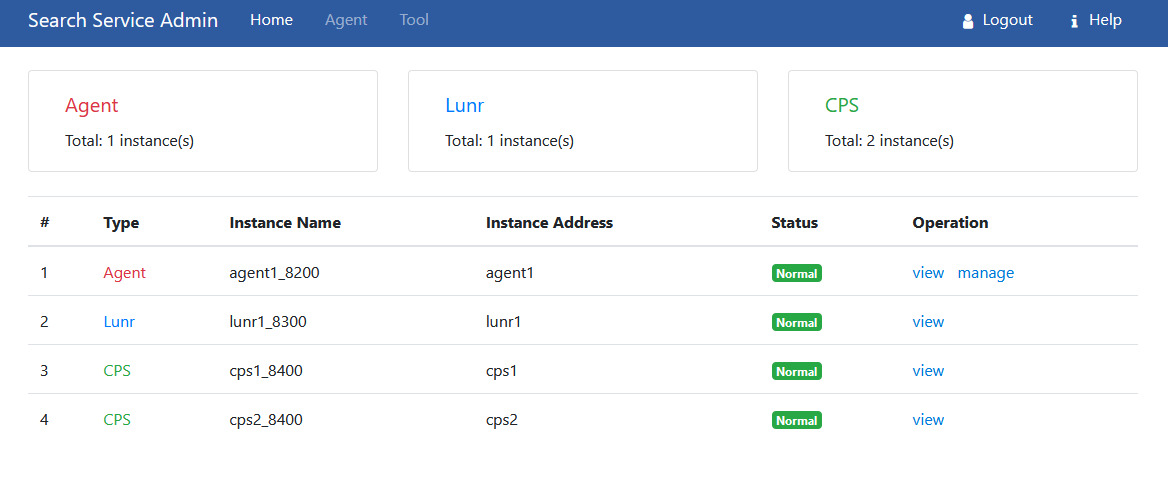
After a while, you should be able to login into the Documentum Search admin page (http://your-host:8800/):
 And if you log in Documentum Administrator:

However, if you run a search, you’ll see that there’s an error and the search is not perfomed. If you watched the Opentext World breakout session for Documentum Search, you’ll probably notice the extra settings used on server.ini to configure the fulltext engine. I’ve tried those without luck, so I just took another approach, to $DOCUMENTUM/product/20.4/bin and do the following:
[dmadmin@dctm204 bin]$ mv libDsearchQueryPlugin.so libDsearchQueryPlugin.bak
[dmadmin@dctm204 bin]$ cp libsolrplugin.so libDsearchQueryPlugin.so
UPDATE: The “nice way” is doing this by editing the dmfulltext.ini file located in $DOCUMENTUM/fulltext.
Then restart the repository and searches should be working on the new search engine:

