Currently everyone wants to do “things” with AI, and content management is no different. Currently OpenText offers Aviator, which might be nice on the cloud (you can even try it for free), but is seems that if you are forced to run this locally (regulated content) you might have some issues, as it seems OpenText doesn’t have enough milking customers with X(pensive)-Plans, that you also have to pay (even more) for Aviator (at least, starting on 25.4, Aviator is available on premises).
Given the reputation of OpenText / Documentum in recent years in terms of support (we all love these cases opened for months to fix one line of code), quality of products (has anyone got SharePoint connector to work?) and their proven record on testing new products (Documentum Search…), it seems slightly optimistic to expect customers to pay (a lot) for something that nobody can guarantee how long it will take until you can effectively use it, or if it even will work at all.
So with this situation, best approach is to take on our hands how to do this. Basically, what we need to do is to apply our own RAG (Retrieval-augmented generation) solution to the documents stored in Documentum. For those of us that have not much idea about AI, this basically means we have to:
- Vectorize documents
- Ask question
- Retrieve vectors
- Send vectors to LLM
- Get answer from LLM infered from the vectorized chunks
In order to do this we need a vector-compatible database (PostgreSQL works) and a LLM (Ollama running locally works). For this I’ll use my existing Documentum 23.4 environment.
First thing we need to do is to enable the vector extensión on PostgreSQL:
CREATE EXTENSION vector;
And we create a table in the Documentum schema:
CREATE TABLE dctm_rag_chunks (
    id UUID PRIMARY KEY,
    r_object_id VARCHAR(32),
    object_name VARCHAR(255),
    chunk_number INTEGER,
    content TEXT,
    embedding VECTOR(384)
);
with this, we need to create a few Java classes to do stuff. First, we will create a class to vectorize documents. This class is going to retrieve documents via REST, and will use something like Apache Tika to extract content from the files in form of chunks, and then store it in the database.
Once we have this, we can see something like this on the vectorized table:
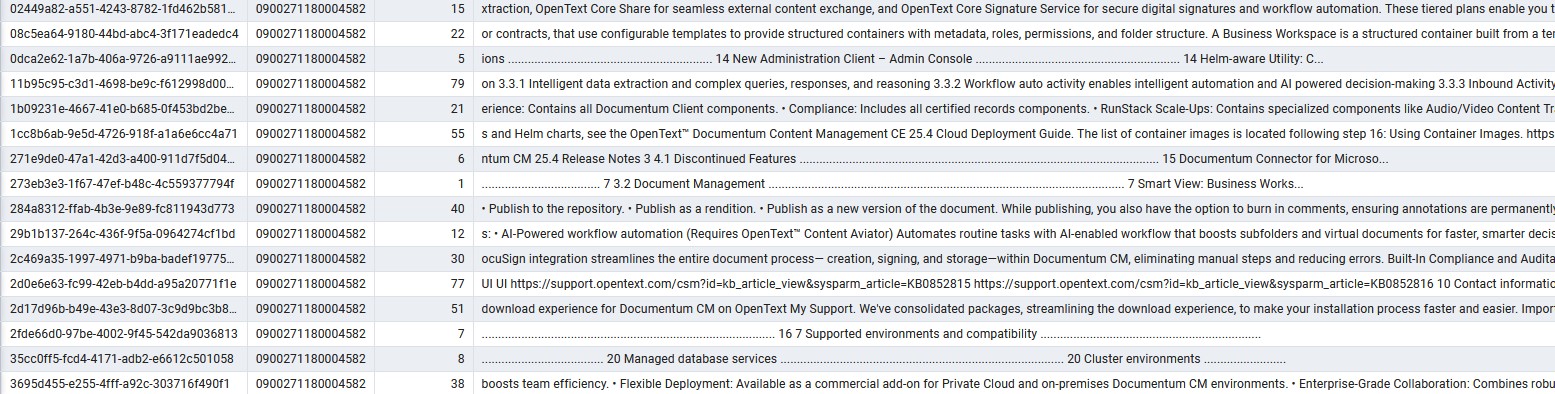
At this point, we can test the retrieval of information, by querying this table, which will return results to our queries, but not in a “human readable” format:
what are the new features in documentum 25.4?

====================================================
RESULT #1
Document : Documentum Content Management Release Notes 25.4.pdf
Folder   : /Temp
ACL      : dm_4500271180000101
Owner    : dmadmin
Score    : 0.6950

or documentation updates that may have been posted after the initial release of this product. 1.1 Release Notes revision history Revision date Sections revised Description of revisions November 2025 First release. All new content. 2 About OpenText Documentum CM 25.4 This section provides an overview of OpenText Documentum CM CE 25.4. OpenText™ Documentum™ Content Management helps organizations pro...

====================================================
RESULT #2
Document : Documentum Content Management Release Notes 25.4.pdf
Folder   : /Temp
ACL      : dm_4500271180000101
Owner    : dmadmin
Score    : 0.6448

erience: Contains all Documentum Client components. • Compliance: Includes all certified records components. • RunStack Scale-Ups: Contains specialized components like Audio/Video Content Transformation Services and Branch Office Caching Services (BOCS). • Other Packages: APIs and Dev Tools, Advanced Workflow, Governance, Transformation Services, Microsoft Integrations, SAP Integrations, Cloud Uti...Then we can code an Ollama client, where we must retrieve the results from the vectorized table, and provide these, with a prompt, to the LLM model, which at the end is going to provide an answer such as:
This means our code is working so far. Now we need to connect this to a running AI model. For this we can install Ollama and run the llama3 model:
curl -fsSL https://ollama.com/install.sh | sh
ollama run llama3
Then we can code an Ollama client, where we must retrieve the results from the vectorized table, and provide these, with a prompt, to the LLM model, which at the end is going to provide an answer such as:
================================================
QUESTION: what are the new features in documentum 25.4?
================================================

================================================
ANSWER
================================================

According to the provided documents, specifically DOCUMENT: Documentum Content Management Release Notes 25.4.pdf, OBJECT ID: 0900271180004582, ACL: dm_4500271180000101, OWNER: dmadmin, FOLDER: /Temp, the new features in OpenText Documentum CM 25.4 are:

* Business Workspaces (3.2)
* Important new packaging for software downloads (3.1)
* Smart View: Business Workspaces (3.2.1)
* Smart View: Relationship Enhancements (3.2.2)
* Smart View: Added ability to “Select all” in a list and combo-box controls (3.2.3)
* Smart View: Document Location Enhancement (3.2.4)
* Smart View: Integration support with DocuSign (3.2.5)
* Smart View: Primary button label changes enhancement (3.2.6)
* Smart View: Streamlined Document Creation and Import (3.2.7)
* Full folder structure searches for Content Aviator (3.2.8)
* Virtual document searches for Content Aviator (3.2.9)
* On-Premises Content Aviator support for Documentum (3.2.10)

These features are described in sections 3 and 4 of the release notes.

================================================
SOURCES
================================================

Document : Documentum Content Management Release Notes 25.4.pdf
Object ID: 0900271180004582
ACL      : dm_4500271180000101
Owner    : dmadmin
Folder   : /Temp
Similarity: 0.6950
Besides this, as you can see in the examples, you can also add some metadata that can be useful:
- ACLs: required for handling security / permissions
- Folder path: required if you want to restrict the LLM to files in a specific folder
and whatever you want to add based on your requirements.
From this point, you can improve the vectorization process, use a better LLM, etc. to get the results you want. Finally, implementing a UI for D2/Smartview, you can have a similar “chat-like” AI assistant to what Aviator offers, for a much lower cost (but probably, hopefully, not as polished as Aviator).