Documentum 25.4 PostgreSQL 17 on Rocky Linux 9.6 (WSL2) Install Guide

This is a step-by-step guide to install Documentum 25.4 in WSL2 using the Rocky Linux 9 (closest to the supported RH9) image with PostgreSQL 17. This version comes with some changes:

  • OT has repackaged (and rebranded for the 100000th time again the products) the installer into zip files
    • Documentum CM runstack:
      • Content Server PostgreSQL and Oracle
      • Documentum Administrator
      • Process Engine
      • Workflow Designer
      • Thumbnail Server
      • iJMS
    • Documentum CM experience:
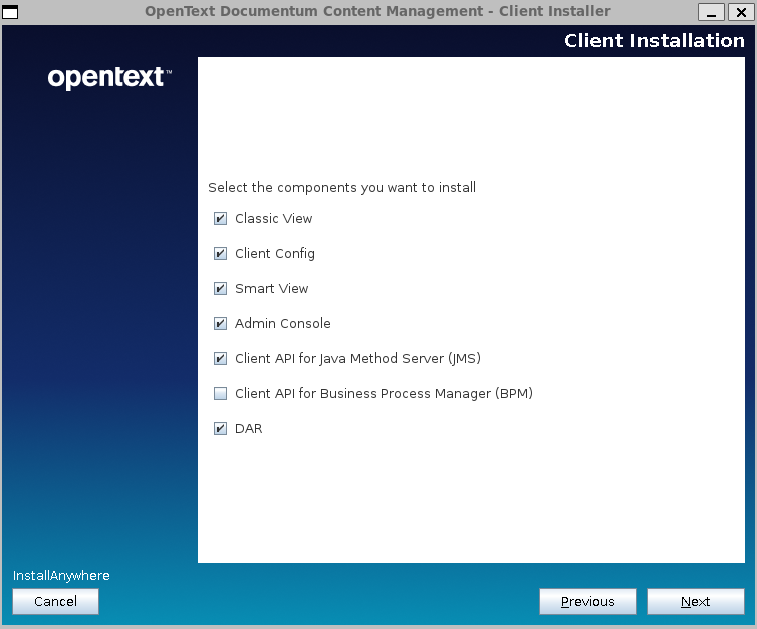
      • Documentum Clients
        • D2 (now called “Classic”) and SDK
        • D2-Config
        • D2-Smartview and SDK
        • Administration Console
        • D2-REST and SDK
        • D2 Mobile
        • D2 Plugins (C2, O2, etc.)
    • Documentum CM API and Dev tools:
      • Composer
      • DFC
      • DFS and SDK
      • DCTM-REST and SDK
      • CMIS
      • Connector for Core
  • Documentum Search is no longer available (until at least 2027) because of performance and result inconsistency issues
  • Tomcat supported version is now 11 (will OT ever update xPlore’s Tomcat?)
  • JMS tomcat no longer has the version on the folder path (now is $DOCUMENTUM/tomcat)
  • OTDSAuthenticator is no longer part of the JMS, but it runs as an http service listening on port 8400. The binaries/configuration are located on $DM_HOME/OTDSAuthLicenseHttpServerBin and the otdsauth.log is now located on $DOCUMENTUM/dba/log
  • We have the new admin console which in theory should replace (one of this years :D) DA. As we have seen for many years with D2, everything comes “preconfigured” for windows (dfc.properties points to “C:\Documentum\config\dfc.properties” on Linux packages). In a “default” installation you can skip deploying this as it has no use:
  • Clients (D2) now have a similar installer as the CS, but OT still can’t properly configure log paths (Engineering must have never heard of catalina.base/home variables. Will they ever stop making all log files on Linux point to C:\Logs\xxx.log?)

Initial Configuration

I will not go through the basic configuration, as you can follow the steps detailed for Documentum 25.2. You just need to use proper Java version and modify the environment variables that change ($DM_HOME, $DM_JMS_HOME, $JAVA_HOME).

Also remember to start the OTDS authentication HTTP service if you want to use licenses, otherwise you could only login into DA. In case you want to setup licensing you can follow the steps from theOTDS licensing configuration post.
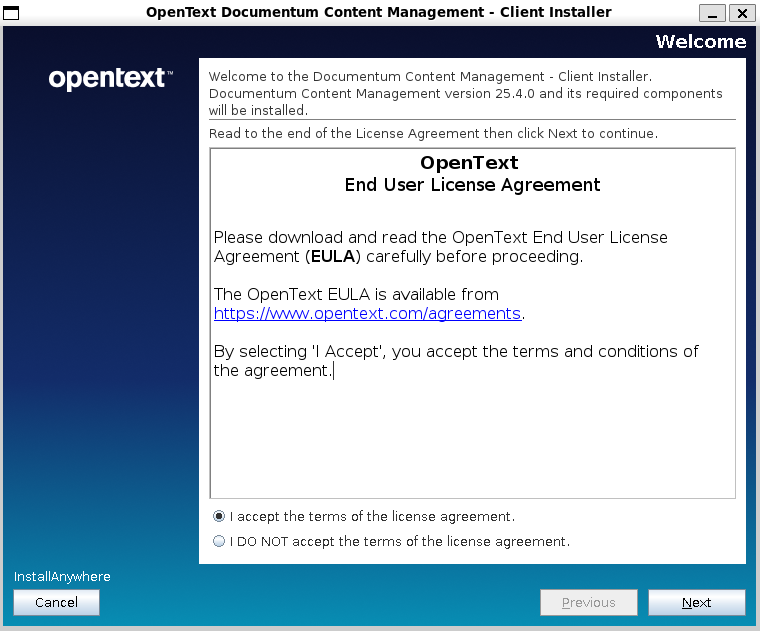
Client installation

You’ll need to unzip the clients package zip and run ./Documentum-Client-Installer.bin:

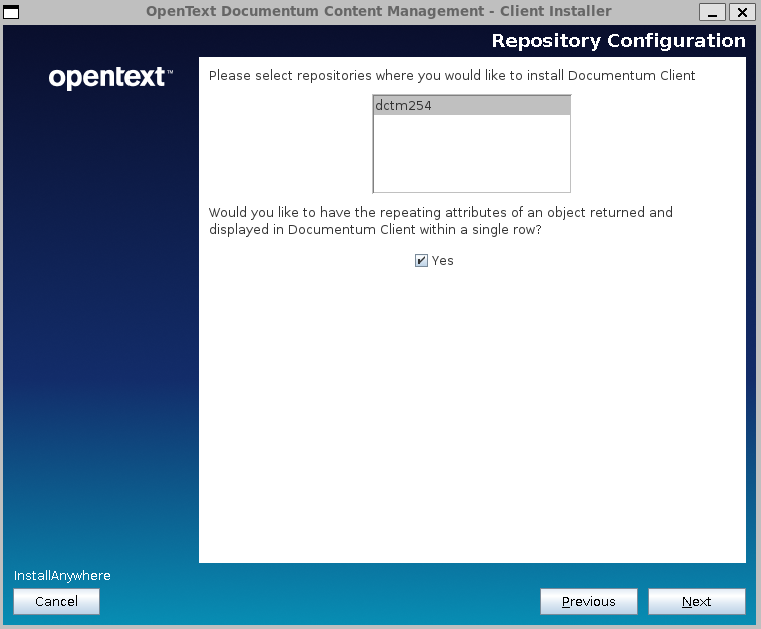
It looks like we finally have support for multiple repositories configuration:

After the installation is done you’ll have the war files ready to be deployed:

  • Drop the files to your Tomcat 11 installation
  • Update dfc.properties and log4j2 and logback configuration (as everything will be writing to C:\xxx)
  • Register dfc.keystores as approved clients

Documentum xPlore vs. Tomcat 10

If you are registered on the OpenText site you’ve probably received this week the notification about the status of xPlore:

  • xPlore 22.1 will be the last version of xPlore, with Patch 12 being the supported version
  • Documentum search is now officially listed as the replacement of xPlore
  • Support for xPlore will finish on 2027 (+ extended)

If you have checked “recently” xPlore 22.1 patches, you’ll have realized that OpenText moved from Wildfly to Tomcat 9 during these patches (on Patch 04 or 05, if I remember correctly) as well as moving to JDK 17. However, despite P12 supporting JDK 21, xPlore still uses Tomcat 9 (remember that latest branch is Tomcat 11, with Tomcat 10 being the version considered “standard” as of today). This situation is strange because all the Documentum stack is running in Tomcat 10… except this. And despite having KBs on how to upgrade Tomcat with minor versions (KB0833958 and KB0833423) is still weird that this is not done yet.

It happens that I had opened a case just a few days before getting the notification mail asking about the status of xPlore and Tomcat 10 (due to Tomcat 9 vulnerability topics) and got this answer:

"Moving to Tomcat 10.x would need upgrading code compilation to Java17. 
This is a larger effort which is not planned." 

So… not believing this statement (as we have recently upgraded everything to Java 17 and it has been basically replacing javax.* packages with jakarta.* packages, and it hasn’t been that much of a “larger effort”) for 3 web applications (dsearch, dsearchadmin and indexagent) I decided to check how difficult this would really be.

First thing, I had to install locally xPlore 22.1, then upgrade it to 22.1 P12 and finally create the PrimaryDsearch and IndexAgent instances. So far, so good.

So let’s try this:

  • Download latest Tomcat 10.1 (currently 10.1.47)
  • Unpack twice the Tomcat 10.1 package (PrimaryDsearch_tomcat10.1.47 and Indexagent_tomcat10.1.47)
  • For PrimaryDsearch instance:
    • Copy PrimaryDsearch_tomcat9.0.100/admindata
    • Copy PrimaryDsearch_tomcat9.0.100/dctmInfo.properties
    • Copy PrimaryDsearch_tomcat9.0.100/webapps (dsearch and dsearchadmin)
    • Copy PrimaryDsearch_tomcat9.0.100/bin scripts (start/stopPrimarySearch and dctmServerStatus.sh)
    • Update PrimaryDsearch_tomcat10.1.47/admindata/admindb/XhiveDatabase.bootstrap with Tomcat 10 path
    • Update PrimaryDsearch_tomcat10.1.47/conf/server.xml to use port 9300
    • Update copied scripts to bin folder with Tomcat 10.1 path
    • Update loggging configuration with Tomcat 10.1 path
  • For IndexAgent instance:
    • Copy Indexagent_tomcat9.0.100/dctmInfo.properties
    • Copy Indexagent_tomcat9.0.100/webapps (IndexAgent)
    • Copy Indexagent_tomcat9.0.100/bin scripts (start/stopPrimarySearch and dctmServerStatus.sh)
    • Update Indexagent_tomcat10.1.47/webapps/IndexAgent/WEB-INF/classes/indexagent.xml with Tomcat 10.1 path
    • Update Indexagent_tomcat10.1.47/conf/server.xml to use port 9200
    • Update copied scripts to bin folder with Tomcat 10.1 path
    • Update loggging configuration with Tomcat 10.1 path

Then we start both Tomcat 10 and… nothing 😀 As expected the javax.* references make this unable to work with Tomcat 10. So what can we do? “Normal” approach would be taking the original source code and replacing javax.* with jakarta.* and dependenies on libraries but a) I do not have the original source code and b) I do not want to be decompiling all the jars. So it is really a large effort? I do not think so.

Apache provides a migration tool that can modify all the references to javax in all the files of your application. So… what if we give it a try? We just need to download the tool and execute it:

./migrate.sh /opt/xplore/PrimaryDsearch_tomcat10.1.47/webapps/javax_dsearch /opt/xplore/PrimaryDsearch_tomcat10.1.47/webapps/dsearch
./migrate.sh /opt/xplore/PrimaryDsearch_tomcat10.1.47/webapps/javax_dsearchadmin /opt/xplore/PrimaryDsearch_tomcat10.1.47/webapps/dsearchadmin
./migrate.sh /opt/xplore/IndexAgent_tomcat10.1.47/webapps/javax_IndexAgent /opt/xplore/IndexAgent_tomcat10.1.47/webapps/IndexAgent

And after few seconds the tool will finish converting the applications and we just have to delete the javax_xxx folders and start PrimaryDsearch and IndexAgent. And what happens now?

Dsearchadmin:

IndexAgent:

IndexAgent status from DA:

Search results:

Total time for this: ~20 min give or take. Considering that probably writing this post has taken me longer that this, not sure if we can qualify this as a “large effort” 😀

Documentum Search 24.4 on Rocky Linux 9.5 (WSL2) Install Guide

This is a step-by-step guide to install Documentum Search 24.4 in WSL2 using the Rocky Linux 9 (closest to the supported RH9) image created in the previous post (or you can use a clean one for this). Documentum Search 24.4 requires:

  • Java being available on the system (this should be already done from the previous post)
  • It is recomended to modify WSL2 configuration to use at least 16GB RAM for the Linux subsystem

Initial Configuration

We will start with configuring the environment for root (using root is not the best approach, but it is “the easiest” way to deal with the provided installation scripts, as these require some root operations):

[root@desktop ~]# vi .bash_profile
export JAVA_HOME=/opt/java/jdk-17.0.12+7
export PATH=$PATH:$JAVA_HOME/bin
export JAVA_TOOL_OPTIONS="-Djdk.util.zip.disableZip64ExtraFieldValidation=true -Djava.locale.providers=COMPAT,SPI --add-opens=java.base/java.lang=ALL-UNNAMED --add-opens=java.base/java.lang.invoke=ALL-UNNAMED --add-exports=java.base/sun.security.provider=ALL-UNNAMED --add-exports=java.base/sun.security.pkcs=ALL-UNNAMED --add-exports=java.base/sun.security.x509=ALL-UNNAMED --add-exports=java.base/sun.security.util=ALL-UNNAMED --add-exports=java.base/sun.security.tools.keytool=ALL-UNNAMED"

ulimit -n 85000
ulimit -u 85000

Next, we will create required folders:

[root@desktop /opt]# mkdir search 
[root@desktop /opt]# mkdir 3rdParty
[root@desktop /opt]# mkdir /SSVC
[root@desktop /opt]# mkdir zkdata
[root@desktop /opt]# mkdir zkdatalog  

Finally, before starting to install/configure DCTM Search 24.4, we need some additional packages:

[root@desktop /opt]# yum -y install wget lsof ncurses procps

Documentum Search Installation

Copy the zip file with the installer to the Linux image, and unzip the zip file and all the included zip files. After everything is unzipped (and all .sh scripts have execution permission) we can start installing Zoekeeper, ActiveMQ and Solr using the provided scripts (that will download automatically the installers)

[root@desktop /opt/search/3rdParty/nix]# ./dwl-zk.sh
[root@desktop /opt/search/3rdParty/nix]# ./dwl-activemq.sh
[root@desktop /opt/search/3rdParty/nix]# ./dwl-solr.sh

[root@desktop /opt/search/3rdParty/nix]# ./cfg-zk.sh
Configuration Complete

[root@desktop /opt/search/3rdParty/nix]# ./cfg-activemq.sh
Creating ActiveMQ Artemis instance at: /opt/3rdParty/activemq/bin/mybroker

Auto tuning journal ...
done! Your system can make 1.29 writes per millisecond, your journal-buffer-timeout will be 776000

You can now start the broker by executing:

   "/opt/3rdParty/activemq/bin/mybroker/bin/artemis" run

Or you can run the broker in the background using:

   "/opt/3rdParty/activemq/bin/mybroker/bin/artemis-service" start

Activemq: Default message broker created!!
Done
Configuration Complete

[root@desktop /opt/search/3rdParty/nix]# ./cfg-solr.sh
Configuration Complete

And we need to start these components before installing Documentum Search:

[root@desktop /opt/search/3rdParty/nix]# ./start-all.sh

For Documentum Search, we need to run the installer providing the server’s dns/ip:

[root@desktop search]# ./documentumsearch-nix-install.sh localhost
/opt/search/silent_install.log
Installation started
This installation will delete/overwrite all data in /SSVC. Continue?
1) Yes
2) No
Select 1 or 2 :: 1

We have to configure dfc.properties:

[root@desktop search]# cd /SSVC/config/dfc
[root@desktop dfc]# vi dfc.properties
dfc.docbroker.host[0]=desktop
dfc.docbroker.port[0]=1489  

And the connection to the repository (be aware that documentation ignores to note that the password needs to be encrypted):

[root@desktop dfc]# cd .. && cd config
[root@desktop config]# java -cp /opt/search/shared/dfc.jar com.documentum.fc.tools.RegistryPasswordUtils <password dmadmin>

[root@desktop config]# vi docbase-details.properties
docbasename=dctm244
docbaseuser=dmadmin
docbasepwd=<encrypted password>

And finally run the repository configurator before starting all the services:

[root@desktop config]# ./configure-docbase.sh
User dmadmin successfully configured for docbase dctm244

Now is the moment to start all the components and check the provided urls to see if everything is working:

[root@desktop config]# cd .. && cd bin
[root@desktop bin]# ./start-cps.sh
Starting PARSER on port 9300. Check http://localhost:9300/actuator/info for details.

[root@desktop bin]# ./start-indexer.sh
Starting INDEXER on port 9200. Check http://localhost:9200/actuator/info for details.

[root@desktop bin]# ./start-coressvc.sh
Starting CORESSVC on port 9100. Check http://localhost:9100/actuator/info for details.

[root@desktop bin]# ./start-fetcher.sh
Starting FETCHER on port 8900. Check http://localhost:8900/actuator/info for details.

[root@desktop bin]# ./start-index-agent.sh
Starting INDEX_AGENT on port 8300. Check http://localhost:8300/actuator/info for details.

[root@desktop bin]# ./start-search-agent.sh
Starting SEARCH_AGENT on port 8200. Check http://localhost:8200/actuator/info for details.

[root@desktop bin]# ./start-admin.sh
Starting ADMIN on port 8820. Check http://localhost:8820/actuator/info for details.

You can check the admin page (only index agent, it doesn’t seem to have something like dsearch) on http://localhost:8820 and login with the default credentials (admin/password):

And you’ll see something like this:

Documentum Search 20.4 Docker install guide

Opentext has released with the 20.4 release a new search engine that will replace xPlore, and that currently is supported in “testing” mode.

Documentation for Documentum Search is better than previous documentations (parameters are finally “properly” explained), and you can also find a full .yaml file to use as template. However, as we could have expected, that didn’t work, so some changes are required.

Environment

Host:
Windows 10 x64 8GB RAM
VMware Workstation Player 15

Guest:
CentOS 7.7 x64 25GB HD 4GB RAM 2 cores
PostgreSQL 11
Documentum 20.4

VM Creation

Just follow the Documentum 20.4 PostgreSQL post as I’ve used that VM.

Install Docker

Refer to Documentum 20.2 Docker install guide if you need help

Documentum Search 20.4

  • Get the images from the Opentext registry:

[dmadmin@dctm204 opt]$ docker login registry.opentext.com
[dmadmin@dctm204 opt]$ docker pull registry.opentext.com/dctm-search-agent:20.4.0
[dmadmin@dctm204 opt]$ docker pull registry.opentext.com/dctm-search-admin:20.4.0
[dmadmin@dctm204 opt]$ docker pull registry.opentext.com/dctm-search-cps:20.4.0
[dmadmin@dctm204 opt]$ docker pull registry.opentext.com/dctm-search-lunr:20.4.0
[dmadmin@dctm204 opt]$ docker pull registry.opentext.com/dctm-search-solr:20.4.0

  • Create folder structure. This is the one I’ve used:

[dmadmin@dctm204 opt]$ tree search
search/
|– admin
| `– logs
|– agent
| `– logs
|– cps
| `– logs
|– cps2
| `– logs
|– dfc.properties
|– lunr
| `– logs
|– search.yaml
|– solr
| |– base
| | |– log4j2.xml
| | `– logs
| |– logs
|– solr2
| |– base
| | |– log4j2.xml
| | `– logs
| |– logs
|– zoo
| |– data
| |– datalog
| `– logs
`– zoo.cfg

  • Create configuration files:

[dmadmin@dctm204 search]$ cp ../documentum/config/dfc.properties .
[dmadmin@dctm204 search] vi zoo.cfg
dataDir=/data
dataLogDir=/datalog
clientPort=2181
tickTime=2000
initLimit=5
syncLimit=2
autopurge.snapRetainCount=3
autopurge.purgeInterval=0
maxClientCnxns=60
standaloneEnabled=true
admin.enableServer=true
4lw.commands.whitelist=mntr,conf,ruok
[dmadmin@dctm204 search] vi solr/base/log4j2.xml
<extract this file from the solr container>

  • Create search.yaml:

[dmadmin@dctm204 search]$ sudo vi search.yaml
<copy the template from the documentation>

At this point, I had several issues with the solr image. First, the container could not write into the mounted folder. In order to fix this, I had to force the uid in the yaml file by adding the following:

user: ‘1000:1000’

After this, Java could not allocate memory for large memory pages. In the end I create a custom image based on the the one from OT (follow the steps detailed on the Reducing Opentext Documentum 20.2 Docker image size post:

[dmadmin@dctm204 search]$ docker run -u 0 –privileged -it –entrypoint /bin/bash registry.opentext.com/dctm-search-solr:20.4.0
echo 22960 &gt; /proc/sys/vm/nr_hugepages
echo 1000 &gt; /proc/sys/vm/hugetlb_shm_group
echo “* soft memlock 626688” &gt;&gt; /etc/security/limits.conf
echo “* hard memlock 626688” &gt;&gt; /etc/security/limits.conf

  • Now if you’ve adjusted the values correctly on the yaml file (stick to 2 “replicas” or the container will also fail) you should be able to run

[dmadmin@dctm204 search]$ docker-compose -f search.yaml up

After a while, you should be able to login into the Documentum Search admin page (http://your-host:8800/):

search_consoleAnd if you log in Documentum Administrator:

index_agent

However, if you run a search, you’ll see that there’s an error and the search is not perfomed. If you watched the Opentext World breakout session for Documentum Search, you’ll probably notice the extra settings used on server.ini to configure the fulltext engine. I’ve tried those without luck, so I just took another approach, to $DOCUMENTUM/product/20.4/bin and do the following:

[dmadmin@dctm204 bin]$ mv libDsearchQueryPlugin.so libDsearchQueryPlugin.bak
[dmadmin@dctm204 bin]$ cp libsolrplugin.so libDsearchQueryPlugin.so

UPDATE: The “nice way” is doing this by editing the dmfulltext.ini file located in $DOCUMENTUM/fulltext.

Then restart the repository and searches should be working on the new search engine: