This is a step-by-step guide to install Documentum Search 24.4 in WSL2 using the Rocky Linux 9 (closest to the supported RH9) image created in the previous post (or you can use a clean one for this). Documentum Search 24.4 requires:
- Java being available on the system (this should be already done from the previous post)
- It is recomended to modify WSL2 configuration to use at least 16GB RAM for the Linux subsystem
Initial Configuration
We will start with configuring the environment for root (using root is not the best approach, but it is “the easiest” way to deal with the provided installation scripts, as these require some root operations):
[root@desktop ~]# vi .bash_profile
export JAVA_HOME=/opt/java/jdk-17.0.12+7
export PATH=$PATH:$JAVA_HOME/bin
export JAVA_TOOL_OPTIONS="-Djdk.util.zip.disableZip64ExtraFieldValidation=true -Djava.locale.providers=COMPAT,SPI --add-opens=java.base/java.lang=ALL-UNNAMED --add-opens=java.base/java.lang.invoke=ALL-UNNAMED --add-exports=java.base/sun.security.provider=ALL-UNNAMED --add-exports=java.base/sun.security.pkcs=ALL-UNNAMED --add-exports=java.base/sun.security.x509=ALL-UNNAMED --add-exports=java.base/sun.security.util=ALL-UNNAMED --add-exports=java.base/sun.security.tools.keytool=ALL-UNNAMED"

ulimit -n 85000
ulimit -u 85000
Next, we will create required folders:
[root@desktop /opt]# mkdir search
[root@desktop /opt]# mkdir 3rdParty
[root@desktop /opt]# mkdir /SSVC
[root@desktop /opt]# mkdir zkdata
[root@desktop /opt]# mkdir zkdatalog
Finally, before starting to install/configure DCTM Search 24.4, we need some additional packages:
[root@desktop /opt]# yum -y install wget lsof ncurses procps
Documentum Search Installation
Copy the zip file with the installer to the Linux image, and unzip the zip file and all the included zip files. After everything is unzipped (and all .sh scripts have execution permission) we can start installing Zoekeeper, ActiveMQ and Solr using the provided scripts (that will download automatically the installers)
[root@desktop /opt/search/3rdParty/nix]# ./dwl-zk.sh
[root@desktop /opt/search/3rdParty/nix]# ./dwl-activemq.sh
[root@desktop /opt/search/3rdParty/nix]# ./dwl-solr.sh

[root@desktop /opt/search/3rdParty/nix]# ./cfg-zk.sh
Configuration Complete

[root@desktop /opt/search/3rdParty/nix]# ./cfg-activemq.sh
Creating ActiveMQ Artemis instance at: /opt/3rdParty/activemq/bin/mybroker

Auto tuning journal ...
done! Your system can make 1.29 writes per millisecond, your journal-buffer-timeout will be 776000

You can now start the broker by executing:

   "/opt/3rdParty/activemq/bin/mybroker/bin/artemis" run

Or you can run the broker in the background using:

   "/opt/3rdParty/activemq/bin/mybroker/bin/artemis-service" start

Activemq: Default message broker created!!
Done
Configuration Complete

[root@desktop /opt/search/3rdParty/nix]# ./cfg-solr.sh
Configuration Complete
And we need to start these components before installing Documentum Search:
[root@desktop /opt/search/3rdParty/nix]# ./start-all.sh
For Documentum Search, we need to run the installer providing the server’s dns/ip:
[root@desktop search]# ./documentumsearch-nix-install.sh localhost
/opt/search/silent_install.log
Installation started
This installation will delete/overwrite all data in /SSVC. Continue?
1) Yes
2) No
Select 1 or 2 :: 1
We have to configure dfc.properties:
[root@desktop search]# cd /SSVC/config/dfc
[root@desktop dfc]# vi dfc.properties
dfc.docbroker.host[0]=desktop
dfc.docbroker.port[0]=1489
And the connection to the repository (be aware that documentation ignores to note that the password needs to be encrypted):
[root@desktop dfc]# cd .. && cd config
[root@desktop config]# java -cp /opt/search/shared/dfc.jar com.documentum.fc.tools.RegistryPasswordUtils <password dmadmin>

[root@desktop config]# vi docbase-details.properties
docbasename=dctm244
docbaseuser=dmadmin
docbasepwd=<encrypted password>
And finally run the repository configurator before starting all the services:
[root@desktop config]# ./configure-docbase.sh
User dmadmin successfully configured for docbase dctm244
Now is the moment to start all the components and check the provided urls to see if everything is working:
[root@desktop config]# cd .. && cd bin
[root@desktop bin]# ./start-cps.sh
Starting PARSER on port 9300. Check http://localhost:9300/actuator/info for details.

[root@desktop bin]# ./start-indexer.sh
Starting INDEXER on port 9200. Check http://localhost:9200/actuator/info for details.

[root@desktop bin]# ./start-coressvc.sh
Starting CORESSVC on port 9100. Check http://localhost:9100/actuator/info for details.

[root@desktop bin]# ./start-fetcher.sh
Starting FETCHER on port 8900. Check http://localhost:8900/actuator/info for details.

[root@desktop bin]# ./start-index-agent.sh
Starting INDEX_AGENT on port 8300. Check http://localhost:8300/actuator/info for details.

[root@desktop bin]# ./start-search-agent.sh
Starting SEARCH_AGENT on port 8200. Check http://localhost:8200/actuator/info for details.

[root@desktop bin]# ./start-admin.sh
Starting ADMIN on port 8820. Check http://localhost:8820/actuator/info for details.
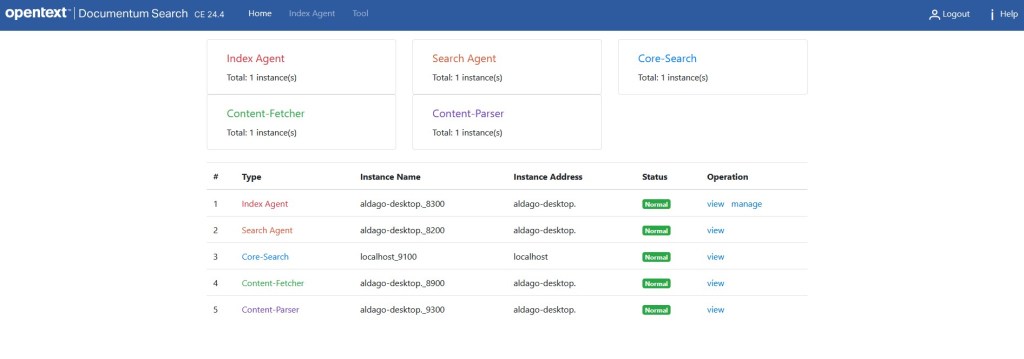
You can check the admin page (only index agent, it doesn’t seem to have something like dsearch) on http://localhost:8820 and login with the default credentials (admin/password):

And you’ll see something like this: